Mega upload premium download
This summary is not available. Please click here to view the post.

တစ္ေန႔ကညီေလး တစ္ေယာက္ေမးတာ folder ကို locker ခ်လို႔ရလားတဲ့ အဲ့ေတာ့ window xp မွာအရင္တုန္း က မွတ္မိသေလာက္ေတာ့ forum တစ္ခုမွာ ေရးသားေပးခဲ့ဖူးတယ္။ခုလည္း window 7 တင္တုန္းဆိုေတာ့ window 7 မွာ လုပ္ၾကည့္တာေတာ္ေတာ္ေလးကို အဆင္ေၿပတယ္။ခု Desktop မွာလုပ္ၾကည့္တာ လႊယ္လည္း လႊယ္တယ္လို႔ဆုိရမယ္။.bat file အမ်ိဴးအစားနဲ႔ private folder ကို yes or no ေရႊးရံုပဲ yes ေပးရင္ lock ေပ့ါ မေပးရင္ေတာ့ unlock ေပါ့။ေအာင့္ကအဆင့္တုိင္းကို လုပ္ၾကည့္ပါ။အရင္ဆံုး Desktop ကေန New text (.txt(notepad))ကိုေခၚယူပါ။မဟုတ္လည္း run က notepad ရုိက္ထည့္ မဟုတ္လည္း New – Shortcut -- ကေန notepad ကိုပြားယူပါ။ၿပီးတာနဲ႔ ေအာင့္က ကုဒ္ကုိထည့္လိုက္ပါ။Desktop တစ္ေနရာမွ မဟုတ္ဘူးေနာ္ ၾကိဳက္တဲ့ hard disk partition ေတြမွာလည္း ဝင္ၿပီး locker လုပ္လုိ႔ရတယ္။သြားရေအာင္
cls
@ECHO OFF
title Folder Private
if EXIST "Control Panel.{21EC2020-3AEA-1069-A2DD-08002B30309D}" goto UNLOCK
if NOT EXIST Private goto MDLOCKER
:CONFIRM
echo Are you sure you want to lock the folder(Y/N)
set/p "cho=>"
if %cho%==Y goto LOCK
if %cho%==y goto LOCK
if %cho%==n goto END
if %cho%==N goto END
echo Invalid choice.
goto CONFIRM
:LOCK
ren Private "Control Panel.{21EC2020-3AEA-1069-A2DD-08002B30309D}"
attrib +h +s "Control Panel.{21EC2020-3AEA-1069-A2DD-08002B30309D}"
echo Folder locked
goto End
:UNLOCK
echo Enter password to unlock folder
set/p "pass=>"
if NOT %pass%== PASSWORD_GOES_HERE goto FAIL
attrib -h -s "Control Panel.{21EC2020-3AEA-1069-A2DD-08002B30309D}"
ren "Control Panel.{21EC2020-3AEA-1069-A2DD-08002B30309D}" Private
echo Folder Unlocked successfully
goto End
:FAIL
echo Invalid password
goto end
:MDLOCKER
md Private
echo Private created successfully
goto End
:End

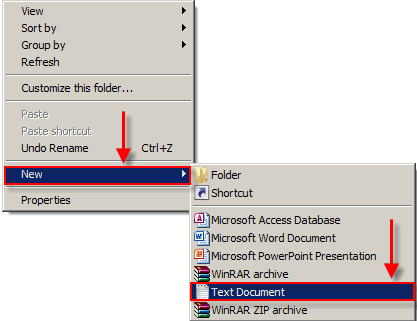
PASSWORD_GOES_HERE ဆိုတဲ့ေနရာမွာ လက္ရွိ 123 လို႔(ေပးခ်င္တဲ့ နံပါတ္)ကိုအစားထိုးထားပါတယ္ ။အေပၚကေပးတဲ့ဟာကို notepad ထဲကူးယူ မဟုတ္လည္း Desktop r click လုပ္ၿပီး New ကေန New Document ကိုေခၚယူၿပီးတာနဲ႔ File ကေန Save or Save ၾကိဳက္ႏွစ္သက္ရာ save လက္ရွိေတာ့ ayemin.bat လုိ႔ desktop မွာ save လုိက္တယ္။
ဒီမွာက .bat file ကို ႏွိပ္လိုက္လို႔ 123 ပတ္ဝက္ကို ခံထားသည့္အတြက္ 123 ရိုက္ထည့္ေပးမွာ private folder ေပၚလာမည္ ၿဖစ္ပါသည္။unlock လုပ္တာပါ။
အေပၚမွာ ေပၚလာေသာ Private လို႔နာမည္ေပးထားေသာ ေနရာမွာ သူငယ္ခ်င္းတို႔ ေဖ်ာက္ခ်င္တဲ့ ဟာေတြ ေဒတာေတြကိုထည့္ ၿပီးတာနဲ႔ .bat(ayemin(နာမည္))ကိုၿပန္ေခၚယူၿပီး yes or no ေတာင္းလွ်င္ lock ေဖ်ာက္မည္ ၿဖစ္တဲ့အတြက္ ကီးဘုတ္က y ႏွိပ္ေပးလိုက္ဒါဆိုရၿပီ။ဒါဆို အဆင္ေၿပလွ်င္ ေၿပသလို .bat file ေရးၿပီး window မွာ ၾကိဳက္သလို lock and unlock လုပ္လို႔ရပါတယ္။အဆင္ေၿပပါေစ။
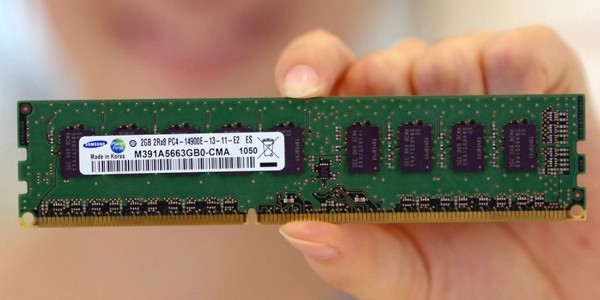
CES just wouldn't be the same without its fair share of "World's first" claims. So, keeping up with tradition is Samsung, which has announced that it has created the World's first DDR4 DRAM.
Samsung company ကေန ဆုိပါတယ္ အေၿခအေန တစ္ရပ္ကုိ ထိန္းသိမ္းတဲ့ အေနနဲ႔ world first အၿမန္ဆံုး ddr 4 ram ကို ထုတ္လုပ္မယ္လို႔ ေၾကငွာ ထားပါတယ္။
Samsung's new 30-nanometer-process memory modules are said to run at more than twice the speed of current DDR3 modules, and will also use less power.
Samsung မွ ထုတ္လုပ္မည့္ 30-nanometer-process DDR 4 Memory မွာ လက္ရွိ ကြန္ပ်ဴတာ Memory ေလာက တြင္ အျမန္ဆံုး ဟု သတ္မွတ္ထားေသာ DDR3 Memory အမ်ိဳးအစား မ်ားထက္ ၂ ဆ ပိုမို ျမန္ဆန္ သြားမွာ ျဖစ္ျပီး ပါ၀ါ အသံုးျပဳမႈ မွာလည္း ပိုမို ေလွ်ာ့နည္း သြားမွာ ၿဖစ္ပါတယ္။
Samsung says that typical DDR3 memory modules available today use around 1.5V of electrical current, whereas its new DDR4 modules will use just 1.2V.
DDR 3 memory မ်ား၏ ပါ၀ါ အသံုး ျပဳမႈ မွာ 1.5V ပတ္၀န္းက်င္ ရွိေၾကာင္း ႏွင့္ အသစ္ ထုတ္လုပ္ မည့္ DDR 4 မွာမႈ ပါ၀ါ အသံုးျပဳမႈ 1.2V သာ ရွိသြားမွာ ၿဖစ္ပါတယ္။Power supply ကေန power သံုးစြဲမွဳ ေလွ်ာ့နည္းသြားမယ့္ သေဘာပါ။
Data transfer speeds on the new DDR4 module can reach 2.133Gbps, according to the company, but it could eventually reach higher speeds of up to 4Gbps.
Motherboard tracks လမ္းေၾကာင္းမ်ားမွာ ddr 4 ram မ်ားနဲ႔ data transfer speed က can reachရရွိႏုိင္ပါတယ္ အနိမ့္ဆံုး 800Mbps မွ အျမင့္ဆံုး 2.133Gbps အထိေပါ့။
This all sounds very impressive, but gave no details as to when we can expect DDR4 to hit the market. Oh, CES, you geek tease.
ေမွ်ာ္လင့္ႏုိင္ပါတယ္ ddr 4 rams မ်ားကို မၾကာမီ ေစ်းကြက္မွာ။
ေအာင့္မွာဝင္ၾကည့္ပါ
Online spec ေတြကို ၾကည့္ၿပီး flash-drive speed နဲ႔ပတ္သတ္လို႔ ရူပ္ရူပ္ေထြးေထြး ၿဖစ္ေကာင္းၿဖစ္ႏုိင္ပါတယ္။တစ္ခါတစ္ေလ ထုတ္လုပ္သူေတြက 150x ေလာက္ကို 200x ေလာက္ ေဖာ္ၿပထားတာကို ေတြ႕ရိွႏုိင္ပါတယ္။တကယ္လို႔ ရွင္းလင္စြာ မသိရွိခဲ့လွ်င္ ဂနန္းသေကၤတ အေၿမွာက္ လကၡာဏာနဲ႔ တြဲၿပတာကို မသိဘဲ ၇ိွနုိင္ပါတယ္။ဖတ္ထားတဲ့ ႏူန္းတား ေရးထားတဲ့ ႏူန္းတားကုိ လို႔ သေဘာထားေပါက္စရာမ်ားရွိလာႏုိင္ပါတယ္။သာမန္အားၿဖင့္ ဒီေဖာ္ၿပခ်က္က brust speed ေတြ ၿဖစ္တယ္။စမ္းသပ္လို႔ ရွိတဲ့ maximum speed လို႔လည္း နားလည္လာႏုိင္ပါတယ္။အၿမန္ဆံုး drive တစ္ခုက တစ္စကၠန္႔ကုိ 300Mb ႏူန္းတား ထားရွိႏုိင္ပါတယ္။ဘယ္လိုပဲၿဖစ္ၿဖစ္ average speed test ေတြမွာ drive အမ်ားစုက 20Mb ႏူန္းထားပင္ ရေလ့ရထ မရွိတက္ေပ။
တကယ္လို႔ flash drive ေတြရဲ႕ speed ကို x နဲ႔ ပူးတြဲၿပတဲ့သေကၤတ သေဘာက CD-ROOM speed ေတြနဲ႔ ႏူိင္းစာေၿပာတဲ့ သေဘာ ၿဖစ္တယ္။Optical drive အေဟာင္းေတြမွာ 1X လုိ႔ ၿပဆုိၿခင္းက တစ္စကၠန္႔ကို 150k ေရးႏုိင္ပါတယ္။ဒါမွ မဟုတ္လည္း ဖတ္ႏုိင္တယ္လို႔ ဆုိလိုတာ ၿဖစ္ပါတယ္။ဒါေၾကာင့္ flash drive မွ 200x လို႔ ၿပဆုိထားၿခင္းက တစ္စကၠန္႔ကုိ 300Mb ႏူန္းတားနဲ႔ ေဆာင္ရႊက္တယ္လို႔ ညႊန္းဆုိထားၿခင္းၿဖစ္တယ္လို႔ မွတ္ယူႏုိင္ပါတယ္္။ဘယ္လုိပဲၿဖစ္ၿဖစ္ ညႊန္းဆုိတဲ့ speed ေတြထက္ ေလွ်ာ့နည္းတာကို ေတာ့ စမ္းသပ္ခ်က္တုိင္းမွာ ေတြ႕ေနရပါတယ္။
ဘယ္ေလာက္ထိေသးငယ္ဦးမွာလည္း?
Usb flash drive မ်ားေပၚခါစက အရႊယ္အစားေတာ္ေတာ္ေလး ကို ၾကီးတာကို ေတႊ႕ရပါတယ္။128Mb usb stick ကို တစ္ေသာင္းခြဲေလာက္ ေပးခဲ့ရတာကို မွတ္မိေနပါတယ္။ယခုအခါ usb stick မ်ားရဲ႕ storage သည္အလႊန္ၿမင့္မားသေလာက္ အရႊယ္အစားက မထင္ေလာက္ေအာင္ကို ေသးငယ္လာတာကုိ ေတြ႕ရပါတယ္။ေစ်းလည္း သက္သာပါတယ္။ဥပမာ Prolink company ရဲ႕ usb stick 2 ဂစ္ေလာက္က ခန္႔မွန္းေၿခ ၁*၀.၅ လက္မအရႊယ္သာ ၿဖစ္ပါတယ္။Usb stick မ်ားကို ေသးငယ္လာေအာင္ ထုတ္လုပ္လာခဲ့ေပမယ့္ Usb port မွာတပ္ဆင္ဖုိ႔အတြက္ ေခါင္းအရႊယ္အစားကိုေတာ့ ေစ်းကြက္မွာ အရႊယ္ငယ္ဆံုး လို႔ ေၾကငွာထားတာက kingmax ရဲ႕ Usb 2.0 Super Stick ၿဖစ္ပါတယ္။အရႊယ္အစားက 34x 12.4 x 2.2-mm ဆိုေတာ့ လက္မနဲ႔ ၿပန္တြက္လွ်င္ 1.34x 0.49x 0.087-inch ၿဖစ္ပါတယ္။သိုေလွာင္မွဳက 1Gb , 2Gb , 4Gb ၿဖစ္ၾကပါတယ္။Pico USB flash drive ကလည္း အရႊယ္အစား 31.3 12.4x 3.4-mm နဲ႔သိုေလွာင္မွဳ 8 Gb ၿဖစ္လို႔ အေသးဆံုးလို႔ ဆုိၿပန္ပါတယ္။ကဲဟုတ္မဟုတ္ကုိေတာ့ ပံုမွာ အေပၚဆံုးမွာ ၾကည့္ႏုိင္ပါတယ္။ကြန္ပ်ဴတာ အမွတ္စဥ္ ၂၀၀၉ စက္တင္ဘာလကေန ဖတ္ရူထားတာကို ၿပန္လည္ မွ်ေဝလုိက္တာပါ။
this post pdf
http://www.mediafire.com/?0bjkx09c5qx54h9

ဒီပို႔စ္က ေရးပီးသား ပို႔စ္တစ္ပုဒ္ပါ။ပ်က္သြားတာနဲ႔ word ကေန recover unsaved document ကေန ၿပန္ရွာ ၿပီး တင္ထားေပးတာပါ။အဲ့ေတာ့ လက္၇ွိ က်န္ေနေသးတဲ့ လႊတ္သြားတဲ့ ပို႔စ္ေတြကို ၿပန္တင္ထားေပးပါ့မယ္။အားတဲ့ခ်ိန္ကို မွ်ၿပီးေပါ့ မဟုတ္လား?Language အေထာင္အကူရေအာင္ http://www.hotfilesearch.com/ ကေန ရွာလိုက္တာ တစ္ခုသြားေတြ႕ တယ္။အသံုးၿပဳရေအာင္ တင္ထားေပးတယ္။Babylon8.1.0r16Full-KnownStranger ပါ ကီးထည့္ေပးစရာ မလုိဘူး။အဂၤလိပ္စာကုိ meaning သိဖို႔က oxford dictionary ကို လွန္ရွာေနမယ့္အစား ဒီေကာင္ေလးနဲ႔ Babylon8.1.0r16Full-KnownStranger လုပ္ၾကည့္ပါလား။ၿမန္မာဘာသာ ၿပန္ႏုိင္ေအာင္ padonma-english-myanmar(.bgl ) file တစ္ဖိုလ္ထည့္ထားေပးမယ္။
padonma-english-myanmar(.bgl )
Install ေပးလိုက္ပါ။ၿပီးလွ်င္ translate ၿပန္ႏုိင္ေလာက္မယ့္ ႏုိင္ငံေတြကို ေရႊးေပးလိုက္ပါ။E mail ပါထည့္ေပးလုိက္ပါ။
ၿမန္မာလို ၿပန္ႏုိင္ေအာင္ Option ကိုသြားလိုက္ပါ။ၿပီးလွ်င္ languages & Dictionaries ကုိသြားလိုက္ပီး ဒီမွာ ေဒါင္းယူၿပီး padonma-english-myanmar ဖုိင္လ္ကို ဆြဲထည့္ေပးလိုက္ပါ။ၿပီးလွ်င္ open ႏွင့္ save ေတာင္းလာလွ်င္ open ကို ေရႊးလုိက္ပီး ေနာင့္မွ transtate လုပ္ႏိုင္မယ့္ padonma-english-myanmar ကို Manage Dictionaries မွာ သာ သြားပီး check ေပးလုိက္ပါ။အေပၚမွာ ၿပထားသလိုေပါ့။အသံုးလုိသူေတြ သံုး၇ေအာင္ပါ။
http://www.mediafire.com/?v2qa1n6st5r4w1j
ဒီပို႔စ္ကို PDF FILE လုိခ်င္ရင္
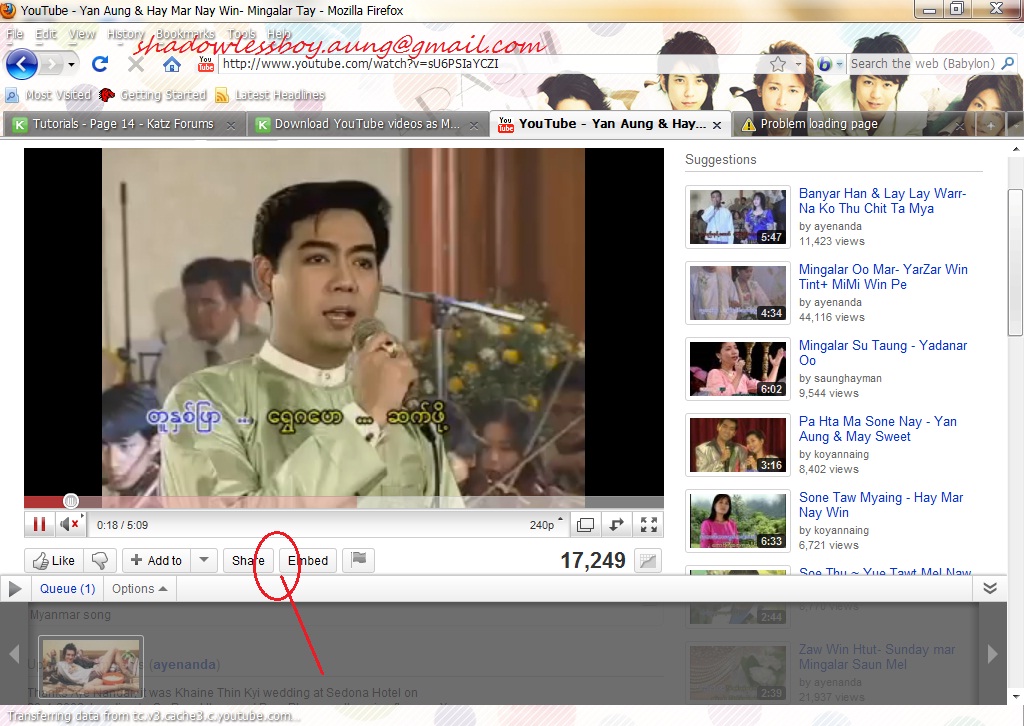
အရမ္းရိုးရွင္းတဲ့ youtube ကေန .mp4 file type တစ္ခုေလာက္ေၿပာင္း ၿပမလုိ႔။ဆုိလုိတာက ပံုမွန္ you tube ကေန video or movie or song တစ္ဖိုလ္ downloading လုပ္လွ်င္ကို internet download manager or other downloader .. အစားအစား လိုအပ္ေကာင္းလုိအပ္ ႏုိင္ပါသည္။ရလာတဲ့ file type မ်ားသည္ .flv file type အမ်ားစုနဲ႔ပဲလာတက္ၾကသည္။တစ္ခါတစ္ေလ တစ္ခ်ိဳ႕ songs or movies မ်ားက ေအာက္ဆံုးမွာ .mp3 file ရေအာင္ေတာ့ embed code ေအာက္နားေလာက္မွာ ညႊန္းထားေပးတက္ပါသည္။သီခ်င္းတိုင္း မူဘီဖိုင္လ္ တုိင္းကို မဆိုလိုပါ။ဒီေတာ့ ဘာ downloader မွာမလိုဘဲ add on တစ္ခုေလာက္နဲ႔ video file type ႏွစ္မ်ိဳးၿဖစ္တဲ့ .flv or mp4 filt type ႏွစ္မ်ိဳးေလာက္ ေဒါင္းၿပမလို႔။ဘာေတြလုိအပ္သလည္း?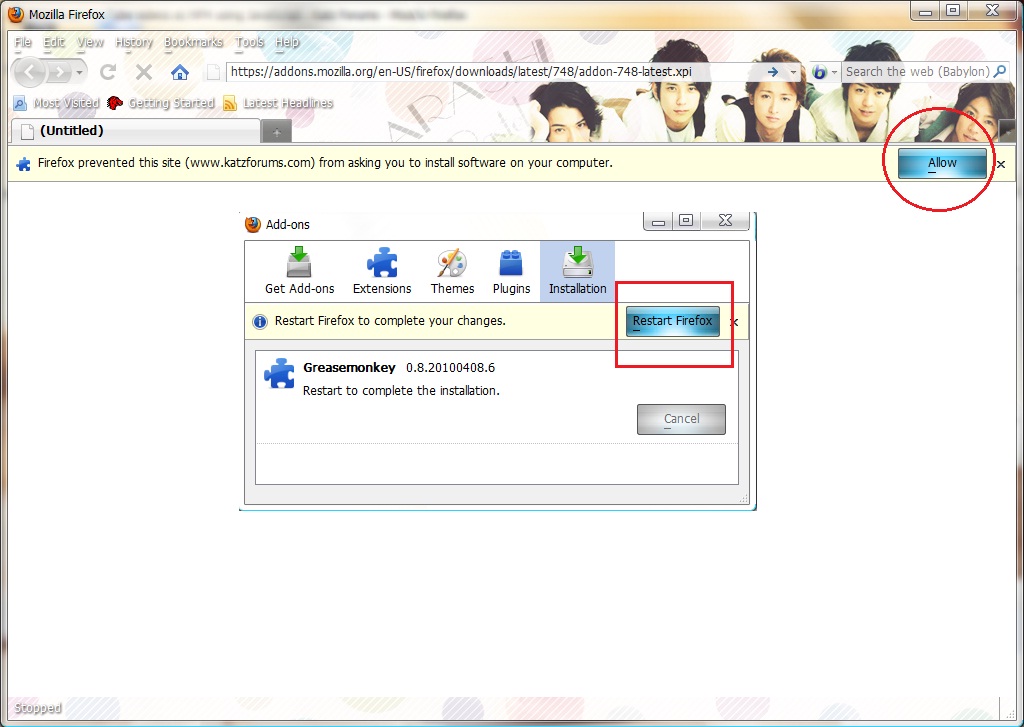
လိုအပ္တာက Mozilla fire fox သံုးထားၿပီး add on တစ္ခုထည့္သြင္းထားရမည္ ၿဖစ္သည္။အဆိုပါ Add on ကို Mozilla fire menu bar Tool / Add-Ons မ်ားမွာလည္း တဆင့္ၾကည့္ႏုိင္ပါသည္။Greasemonkey addon. တစ္ခုကို အဆိုပါ Tool / Add-Ons မွာ ထည့္သြင္းေပးရမည္ ၿဖစ္သည္။ေအာက္က ေပးထားေသာ link ကုိသြားၿပီး Greasemonkey addon. ကိုထည့္သြင္းေပးလိုက္ပါ။Allow ေတာင္းလာလွ်င္ ေပးလိုက္ၿပီး Installation ကုိဆက္လက္ေပးလိုက္ပါ။ၿပီးလွ်င္ fire fox ကို restart ေပးလိုက္ပါ။
Greasemonkey addon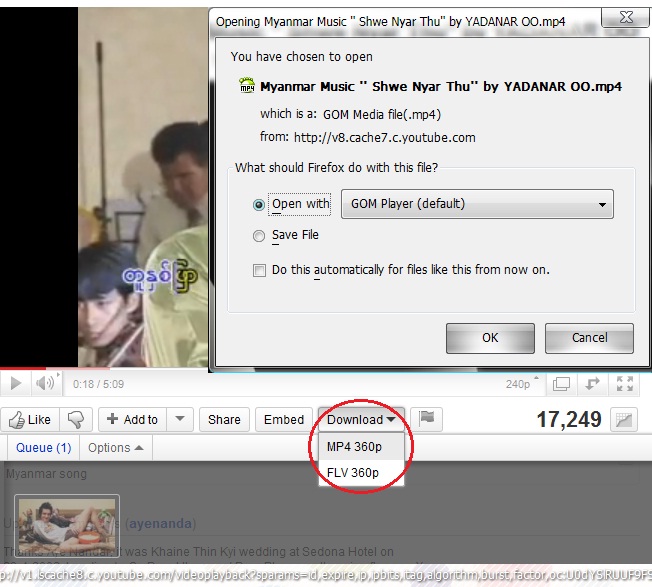
ၿပီးလွ်င္ Mozilla loading ၿပန္တက္လာ လွ်င္ လိုခ်င္ေသာေဒါင္းလိုေသာ move files သို႔မဟုတ္လည္း songs သုိ႔မဟုတ္လညး္ ၾကိဳက္ႏွစ္သက္ရာမ်ားကို အေပၚမွာ ၿပထားသည့္အတုိင္း Embed နားေလာက္မွာ Download ဆိုတာ ေပၚေနမည္ၿဖစ္ပါသည္။အဲ့ေတာ့ ၾကိဳက္ႏွစ္သက္ရာကို ေဒါင္းယူလိုက္ပါ။.mp4 file type ဆုိေတာ့ ဖုန္းထဲ လည္းေတာ္ေတာ္မ်ားမ်ားလက္ခံတဲ့ file type ဆုိေတာ့ အၾကိဳက္ေတြ႕မွာပါ။ကၽႊန္ေတာ္ၿပတဲ့နည္းကို အၾကိဳက္ေတြ႕မွာပါ။လြယ္ကူပါတယ္ add on တစ္ခုေလာက္နဲ႔ file types ႏွစ္မ်ိဳးေလာက္ ေဒါင္းရေအာင္ေပါ့။
ဒီပို႔စ္ကို PDF FILE လုိခ်င္ရင္
Usb driver or memory stick ေတြမွာ virus attacks တုိက္ခုိက္ခံရလွ်င္ ကာကြယ္ဖုိ႔ နည္းလမ္းမ်ားစြာ ရိွပါတယ္။ဘယ္လုိၿဖစ္ၿဖစ္ google sever မွာ ရွာဖတ္လွ်င္ကို link ေတြက်လာမွာ ၿဖစ္ပါတယ္။ခုလည္း stick တစ္ခုမွာ autorun.inf ဖိုင္လ္တည္ေဆာက္ၿပီး ထည့္ထားဖုိ႔ၿဖစ္ပါတယ္။Autorun.inf ဖုိင္လ္ဆုိတာ ဘာလည္း?လက္ရိွ သိသေလာက္ေတာ့ ကၽႊန္ေတာ္တို႔ေတြ ကြန္ပ်ဴတာမွာ usb ports ဆုိတာ casing မွာ ႏွစ္ခု သို႔မဟုတ္လည္း casing ေနာက္က input/output shields မ်ားမွာလည္း usb ports မ်ားကေတာ့ ပါရိွလာမွာ ၿဖစ္ပါတယ္။အဆုိပါ Usb port မ်ားမွာ memory stick မ်ားထုိးသည့္အခါ pop menu တစ္ခုတက္လာပါတယ္။အဆုိပါ ဖုိင္လ္ကေန ဗိုင္းလ္ရပ္စ္အမ်ားဆံုးကူးစက္ပါတယ္။ဗိုင္းရပ္စ္ကို အသက္ဝင္ လာေအာင္ ခလုတ္ဖြင့္ေပးတာ အဆိုပါ autorun.inf ဖုိင္လ္ပါ။အဆိုပါ ဖိုငလ္ကို ကိုယ္တုိင္ဖန္တီးႏုိင္ပါတယ္။Myanmar chat online က အစ္ကိုတစ္ေယာက္ေမးသြားတာပါ။အစ္ကိုက phoothar3.co.cc ကိုေရးတာလား atuorun.inf တည္ေဆာက္ပံုေလး ေရးေပးပါဦး။လက္ရိွအေန ထားေလာက္နဲ႔ သိသေလာက္ေတာ့ ေၿဖၿပေပးပါ့မယ္။
Window key နဲ႔ r ကီးေခၚေခၚ သို႔မဟုတ္လည္း လက္ရိွ os start menu ကေန notepad ကိုရိုက္ဖြင့္ၿပီး ေအာက္က ကုဒ္ကုိ ကူးထည့္လုိက္ပါ။
[autorun]
icon=myicon.ico
File\Save As (File name:) မွာ autorun.inf လုိ႔ရုိက္ပီး Encoding မွာ ANSI သို႔ေၿပာင္းပီး harddisk partition တစ္ခန္းမွာ saving ေပးလုိက္ပါ။ၿပီးမွ stick ကုိ format ရုိက္ထုတ္လုိက္ၿပီး အဆုိပါ ဖုိင္လ္ကိုကူးထည့္လုိက္ပါ။ဒီနည္းဟာ လံုၿခံဳရေသာ နည္းလမ္းတစ္ခုေတာ မဟုတ္ေပ။စက္မွာ ဗိုင္းရပ္စ္ attacks ခံရလွ်င္ကို stick ထဲထည့္ထားတဲ့ autorun.inf file ကို replace ဖလွယ္ကာ အစားထုိးဝင္ေရာက္ပီး ဗိုင္းရပ္စ္ attack ခံရဖုိ႔လည္း ၿဖစ္လာႏုိင္ပါတယ္။သုိမဟုတ္လည္း သီးၿခား sticks မ်ားကို lock ခ်လို႔ရေသာ password 'Lockn go Professional','Lockngo Standard', 'PortableSweeper', 'Pen Protect' သီးၿခားေဆာ့ဝဲလ္မ်ားသံုးၿပီးလည္း စမ္းၾကည့္ အသံုးခ် ႏုိင္ပါတယ္။သိသေလာက္နဲ႔ ေရးသားရတဲ့အတြက္ မရွင္းလင္းတာ ရိွရင္ နားလည္ေပးပါ ခင္ဗ်ာ:D
လက္ရိွ ကိုယ္ေရးကိုတာ ကိစၥေတြက မ်ားေနတာနဲ႔ ဘေလာ့လ္ဘက္ေတာင္ လွည့္မေရးၿဖစ္တာ။ဘယ္လုိ ၿဖစ္ၿဖစ္ စိတ္ကူူးကေတာ့ တစ္ေန႔ကိုပို႔စ္တစ္ပုဒ္ေလာက္ တက္ေအာင္ေတာ့ေရးခ်င္ပါတယ္။လက္တေလာ ဒီအပတ္က စာေမးပြဲကလည္းရွိ ေက်ာင္းက refrence စာတမ္းတင္ရမွာနဲ႔ မအားလပ္ၿဖစ္တာ။ခုဘယ္လုိ ၿဖစ္ၿဖစ္ ေတာ့ အားတာနဲ႔စာေရးခ်င္လာတဲ့ အေလ့အထရိွေတာ့ ေရးခ်င္ပါတယ္။cpu-z_1.56-setup-en ဒီ free ware software နဲ႔အတူ cpu အေၾကာင္းကို နည္းနည္းေလာက္ ေခါက္ၾကည့္မလုိ႔။စာဖတ္ခဲ့တဲ့ အေတြ႕အၾကံဳအရ သိသေလာက္ေပါ့။အရင္ကလည္း ကြန္ပ်ဴတာ တပ္ဆင္နည္းကို building a pc part 1 and 2 မွာ cpu အေၾကာင္းေတြကို ၿဖည့္စြက္ၿပီး ကၽႊန္ေတာ္ေရးခဲ့ၿပီးၿဖစ္ပါတယ္။ေအာက္က ႏွစ္လင့္မွာဖတ္ယူလုိက္ပါ။
http://www.phoothar3.co.cc/2010/08/hardware-software-hardware-processor-or.html
http://www.phoothar3.co.cc/2010/08/building-pc-part-2-1cpu-installation.html
http://www.filehippo.com/download_cpuz/

Free ware ဆိုေတာ့ download link ကို direct link ကုိပဲညႊန္းထားေပးတယ္ အေပၚက ေအာက္ဆံုးလင့္မွာေဒါင္းယူလိုက္ၿပီး installation ေပးလုိက္ပါ။ဒီအဆင့္မွာမိတ္ေဆြတို႔ရဲ႕ သံုးေနေသာ browser ေတြမွာ ask tool bar ထည့္မလားေမးတဲ့အဆင့္မွာ ၿဖဳတ္ေပးလုိက္ပါ။ဒါမ်ိဳးက free ware software ေတာ္ေတာ္မ်ားမ်ားမွာ ဒီ setting ပါလာတာၿဖစ္ပါတယ္။ၿပီးလွ်င္ ေအာက္ကလို cpu-z_1.56-setup-en software ရဲ႕ လုပ္ေဆာင္ပံုကိုေတြ႕ရမွာ ၿဖစ္ပါတယ္။
cpu setting ကိုၿပထားတာၿဖစ္ပါတယ္။processor name (intel company series ကထုတ္ေသာ processor Pentium 1234 ကမွ Pentium 4 processor 524 ၿဖစ္ပါတယ္။Code Name ကေတာ Prescott ၿဖစ္ၿပီး Package ကေတာ့ လက္၇ိွ ဒီ cpu Pentium 4 ေအာက္ကထုိင္တဲ့ cpu အမ်ိဳးစား socket type ၿဖစ္ပီး model number က Socket 775 LGA ၿဖစ္ၿပီး Technology 90nm(nanometer ၿဖစ္ပါတယ္)အေသးစိတ္ကို ဒီလင့္မွာ http://en.wikipedia.org/wiki/90_nanometer ဖတ္ရူလုိက္ပါ။Core voltage အေၾကာင္းကိုေတာ့ ဒီလင့္ http://www.tomshardware.com/reviews/spider-weaves-web,1728-15.html မွာ ဖတ္ရူလုိက္ပါ။Clock Speed ကေတာ့ ယခု cpu 3.06mhz မွာ mhz က clock speed or cpu speed ၿဖစ္ပီး အပိုင္းမွာ external speed နဲ႔ internal speed ဆုိပီး ႏွစ္ပိုင္းကြဲသြားပါတယ္။Buliding a pc part 2 မွာေရးခဲ့ ၿပီးၿဖစ္ပါတယ္။Core speed ကေတာ့ internal speed ကိုေခၚဆိုတာပါ။Multiplier ကေတာ့ bus/core ratio ၿဖစ္ၿပီး bus လမ္းေၾကာင္း mother board tracks လမ္းေၾကာင္းလို႔ေခၚ အဲ့လမ္းေၾကာင္းရဲ႕ အဆက္သြယ္ရဖုိ႔ cpu internal speed ကို တိုင္းတာပါတယ္။အေသးစိတ္ကို ဒီလင့္ http://en.wikipedia.org/wiki/CPU_multiplier မွာဖတ္ရူလို္က္ပါ။Bus လမ္းေၾကာင္း bus speed ဆုိတာ ကၽႊန္ေတာ္တုိ႔ motherboard ေပၚမွာ data signals မ်ား သြားရာ လမ္းေၾကာင္းသည္ mother board ေပၚမွာ tracks လမ္းေၾကာင္းမ်ားကို အလႊာလိုက္ရိုက္ထားပါတယ္။အဲလ့ို bus လမ္းေၾကာင္း motherboard bus tracks မ်ား cpu နဲ႔အဆက္သြယ္ဖို႔ လုပ္ေဆာင္ႏူန္းကိုေခၚဆုိတာပါ။Rated FSBဆိုတာက external speed ပါ။Front side bus လုိ႔လည္းေခၚဆုိပါတယ္ တနည္းဆိုရလွ်င္ အဆုိပါအေၾကာင္းကို part 2 မွာေရးခဲ့ၿပီးၿဖစ္ပါတယ္။Cache ဆုိတာက ဆုိတာက s ram အမ်ိဳးစားပါ။ကၽႊန္ေတာ္တို႔လက္ရိွ ram အမ်ိဳးအစားက d ram ပါ။S ram ဆုိတာက ဒိ ram အမ်ိဳးအစားသည္ ရိုးရိုး sd ram or ခုသံုးေနၾကတဲ့ ddr2 ram or 3 or 4 ram မ်ားထက္ မ်ာစြာလွ်င္ၿမန္မပါတယ္။Data transfer rate ကအစ သို႔ေပမယ့္ memory store လုပ္ႏုိင္တဲ့ အက်ယ္အဝန္းကေတာ့ နည္းပါတယ္။အလႊန္ဆံုး MB မီဂါဘုိင္ပါဘဲ။GB ဂီဂါဘိုက္ေတာင္ မထြက္ေသးပါဘူး။အဲ့ပိုင္းေတြကို ကၽႊန္ေတာ္ေရးေပးခဲ့ၿပီးၿဖစ္ပါတယ္ part 2 or 1 မွာပါ။ဘယ္လုိၿဖစ္ၿဖစ္ free ware လည္းၿဖစ္ hard ware cpu info ကုိအေသးစိတ္ၿပေပးေတာ့ ဘယ္လိုၿဖစ္ၿဖစ္ ေတာ့တနည္းနည္းေတာ့ အသံုးဝင္မွဳပိုင္းေတြ ရိွလာမွာပါ။ေလ့လာရင္းေပ်ာ္ရႊင္ပါေစဗ်ာ

ကၽႊန္ေတာ္လည္း ကိုယ္ေရးကိုယ္တာ ကိစၥေတြနဲ႔ ဘေလာ့လ္ဘက္ေတာင္ လွည့္ေရးၿဖစ္တာၾကာသြားပီ။ဒီေတာ့ တက္ႏုိင္သေလာက္ေတာ့ ကိုယ္လည္း စာေရးတာဝါသနာပါလာတာ အထုိက္အေလွ်ာက္ေတာ့ အခ်ိန္ေတာ့ မွ်ေရးၿခင္တယ္။ဝင္းဒိုးေတြ version ၿမင့္လာတာသည္ႏွင့္အမွ် Microsoft ကေန produce ထြက္လာတာ မနည္းေတာ့ေပ။ဒါေပမယ့္ ဝင္းဒိုးတစ္ခု သံုးစြဲသည္ႏွင့္အမွ် အထုိက္အလိုက္ေတာ့ ဝင္းဒိုး short cuts keys မ်ားကို သိလာဖုိ႔ေတာ့လုိပါတယ္။အကုန္လံုးေတာ့ အလြတ္ရလားလုိ႔ေမးလာလွ်င္ေတာ့ ဘယ္သူမွေတာ့ အလြတ္ရတာေတာ့ မမွန္ေပ။ဒါေပမယ့္ အနည္းႏွင့္အမ်ားကေတာ့ window lock ခ်ဖုိ႔ window key + l ကီးႏွိပ္တာေလာက္ေတာ့ သိၿပီးသားေလာက္ေတြပါ။ဘယ္လုိၿဖစ္ၿဖစ္ လက္၇ိွ google ကေန ရွာေဇြလို႔၇သမွ်ရယ္ ကၽႊန္ေတာ္သိသမွ်ကို ခ်ၿပေပးပါ့မယ္။လက္၇ိွ window 7,xp ,vista shortcut keys မ်ားကို ေအာက္မွာ ခ်ၿပထားေပးပါ့မယ္။အဆုိပါ ပို႔စ္နဲ႔အတူ pdf ပါ လုပ္ထားေပးပါ့မယ္။အသံုးလိုသူေတြ ၇ိွသလို မလုိသူမ်ားလည္း အမွတ္တရေလး တစ္ခုေတာ့ သိမ္းထားေပးေပါ့။ကိုယ္လိုခ်င္တဲ့အခါေတြ ခ်သံုးႏုိင္ေအာင္ပါ။အရင္ဆံုး 7 ကေန short cuts keys မ်ားကို အ၇င္ခ်ေရးထားပါ့မယ္။အားလံုး မဟုတ္ေပမယ့္ ၇ွာသမ်ွေပါ့။သို႔မဟုတ္လည္း window ကို Microsoft ကေန အကူညီ၇ေအာင္ Help setting ပိုင္းကို start menu မွာထည့္သြင္းထားၿပီးသားပါ။အဲ့ setting ပုိင္းကေန ၇ွာေဖြလိုကလည္း ၇ွာလို႔ရပါတယ္။ဝင္းဒုိး၇ဲ႕ အေသးစိတ္ ပိုင္းကိုေလ့လာမယ္ဆုိလွ်င္ Help and supports setting ပုိင္းအသံုးဝင္တာကိုေတာ့ အရင္ပိ႔စ္ေတြက ေရးထားၿပီးသားၿဖစ္ပါတယ္။
New in Windows 7
The → symbol stands for the right arrow key, ← for the left arrow key, etc.
Win+↑ Maximize the current window
Win+↓ If the current window is maximized, restore it; if the current window is restored, minimize it
Win+← Dock the current window to the left half of the screen
*If it is already docked left, it is moved to the right half of the screen
*If it is already docked right, it is restored to its original size
Win+→ Dock the current window to the right half of the screen
*If it is already docked right, it is moved to the left half of the screen
*If it is already docked left, it is restored to its original size
Win+Shift+← Move current window to the left monitor (with dual monitors)
Win+Shift+→ Move current window to the right monitor (with dual monitors)
Win+Home Minimize all but the current window
Win+Space Peek at the desktop
Win+[Plus sign] Zoom in
Win+[Minus sign] Zoom out
Win+P Open the projection menu (generally used for laptops connected to projectors)
Alt+P In Explorer, show/hide the preview pane
Taskbar Modifiers (New in Windows 7)
Shift+Click Open a new instance of the program
Ctrl+Click Cycle between windows in a group
Middle Click Open a new instance of the program
Ctrl+Shift+Click Open a new instance of the program as Administrator
Shift+Right-Click Show window menu
Managing Windows
Alt+F4 Close the active window
Alt+Tab Switch to previous active window
Alt+Esc Cycle through all open windows
Win+Tab Flip 3D [more info]
Ctrl+Win+Tab Persistent Flip 3D
Win+T Cycle through applications on taskbar (showing its live preview)
Win+M Minimize all open windows
Win+Shift+M Undo all window minimization
Win+D Toggle showing the desktop
Win+↑ Maximize the current window
Win+↓ If the current window is maximized, restore it; if the current window is restored, minimize it
Win+← Dock the current window to the left half of the screen
*If it is already docked left, it is moved to the right half of the screen
*If it is already docked right, it is restored to its original size
Win+→ Dock the current window to the right half of the screen
*If it is already docked right, it is moved to the left half of the screen
*If it is already docked left, it is restored to its original size
Win+Shift+← Move current window to the left monitor (with dual monitors)
Win+Shift+→ Move current window to the right monitor (with dual monitors)
Win+Home Minimize all but the current window
Win+Space Peek at the desktop
Win+[Plus sign] Zoom in
Win+[Minus sign] Zoom out
Starting Programs
Win+1 Open the first program on your Quick Launch bar
Win+2 Open the second program on your Quick Launch bar
Win+n Open the nth program on your Quick Launch bar
Win+U Open the ease of access center
Win+F Open the search window
Win+X Open the Mobility Center
Win+E Open Explorer
Win+R Open the Run window [more info]
Win+B Move focus to notification tray (the right-most portion of the taskbar)
Win+P Open the projection menu (generally used for laptops connected to projectors)
Win+Pause Open the System Properties portion from the Control Panel
Ctrl+Shift+Esc Open Windows Task Manager
Logging In And Out
While the below shortcuts seem unwieldy because of their length, they're quite easy to remember once you try them out a few times.
Win, →, Enter Shutdown
Win, →, →, R Restart
Win, →, →, S Sleep
Win, →, →, W Switch Users
Win+L Locks computer
Viewing Folders With Explorer
Alt+← Go back
Alt+→ Go forward
Alt+↑ Go up a directory
Alt+D Move focus to address bar
Alt+D, Tab Move focus to search bar
Alt+Enter Open the Properties window of the current selection
Ctrl+Mousewheel Change the view type (extra large, small, list view, detail, etc.)
Alt+P Show/hide the preview panelအေသးစိတ္ကိုေတာ့ ေအာက္ကခ်ေပးေသာ link မွာေလ့လာၾကည့္ေပးပါ။
http://productivity.ben61a.com/windows/windows-7-shortcut-keys.php
ဒါက window xp ပိုင္းရဲ႕ short cuts keys မ်ားပါ။
General keyboard shortcuts
• CTRL+C (Copy)
• CTRL+X (Cut)
• CTRL+V (Paste)
• CTRL+Z (Undo)
• DELETE (Delete)
• SHIFT+DELETE (Delete the selected item permanently without placing the item in the Recycle Bin)
• CTRL while dragging an item (Copy the selected item)
• CTRL+SHIFT while dragging an item (Create a shortcut to the selected item)
• F2 key (Rename the selected item)
• CTRL+RIGHT ARROW (Move the insertion point to the beginning of the next word)
• CTRL+LEFT ARROW (Move the insertion point to the beginning of the previous word)
• CTRL+DOWN ARROW (Move the insertion point to the beginning of the next paragraph)
• CTRL+UP ARROW (Move the insertion point to the beginning of the previous paragraph)
• CTRL+SHIFT with any of the arrow keys (Highlight a block of text)
• SHIFT with any of the arrow keys (Select more than one item in a window or on the desktop, or select text in a document)
• CTRL+A (Select all)
• F3 key (Search for a file or a folder)
• ALT+ENTER (View the properties for the selected item)
• ALT+F4 (Close the active item, or quit the active program)
• ALT+ENTER (Display the properties of the selected object)
• ALT+SPACEBAR (Open the shortcut menu for the active window)
• CTRL+F4 (Close the active document in programs that enable you to have multiple documents open simultaneously)
• ALT+TAB (Switch between the open items)
• ALT+ESC (Cycle through items in the order that they had been opened)
• F6 key (Cycle through the screen elements in a window or on the desktop)
• F4 key (Display the Address bar list in My Computer or Windows Explorer)
• SHIFT+F10 (Display the shortcut menu for the selected item)
• ALT+SPACEBAR (Display the System menu for the active window)
• CTRL+ESC (Display the Start menu)
• ALT+Underlined letter in a menu name (Display the corresponding menu)
• Underlined letter in a command name on an open menu (Perform the corresponding command)
• F10 key (Activate the menu bar in the active program)
• RIGHT ARROW (Open the next menu to the right, or open a submenu)
• LEFT ARROW (Open the next menu to the left, or close a submenu)
• F5 key (Update the active window)
• BACKSPACE (View the folder one level up in My Computer or Windows Explorer)
• ESC (Cancel the current task)
• SHIFT when you insert a CD-ROM into the CD-ROM drive (Prevent the CD-ROM from automatically playing)
• CTRL+SHIFT+ESC (Open Task Manager)
Back to the top
Dialog box keyboard shortcuts
If you press SHIFT+F8 in extended selection list boxes, you enable extended selection mode. In this mode, you can use an arrow key to move a cursor without changing the selection. You can press CTRL+SPACEBAR or SHIFT+SPACEBAR to adjust the selection. To cancel extended selection mode, press SHIFT+F8 again. Extended selection mode cancels itself when you move the focus to another control.
• CTRL+TAB (Move forward through the tabs)
• CTRL+SHIFT+TAB (Move backward through the tabs)
• TAB (Move forward through the options)
• SHIFT+TAB (Move backward through the options)
• ALT+Underlined letter (Perform the corresponding command or select the corresponding option)
• ENTER (Perform the command for the active option or button)
• SPACEBAR (Select or clear the check box if the active option is a check box)
• Arrow keys (Select a button if the active option is a group of option buttons)
• F1 key (Display Help)
• F4 key (Display the items in the active list)
• BACKSPACE (Open a folder one level up if a folder is selected in the Save As or Open dialog box)
Back to the top
Microsoft natural keyboard shortcuts
• Windows Logo (Display or hide the Start menu)
• Windows Logo+BREAK (Display the System Properties dialog box)
• Windows Logo+D (Display the desktop)
• Windows Logo+M (Minimize all of the windows)
• Windows Logo+SHIFT+M (Restore the minimized windows)
• Windows Logo+E (Open My Computer)
• Windows Logo+F (Search for a file or a folder)
• CTRL+Windows Logo+F (Search for computers)
• Windows Logo+F1 (Display Windows Help)
• Windows Logo+ L (Lock the keyboard)
• Windows Logo+R (Open the Run dialog box)
• Windows Logo+U (Open Utility Manager)
Back to the top
Accessibility keyboard shortcuts
• Right SHIFT for eight seconds (Switch FilterKeys either on or off)
• Left ALT+left SHIFT+PRINT SCREEN (Switch High Contrast either on or off)
• Left ALT+left SHIFT+NUM LOCK (Switch the MouseKeys either on or off)
• SHIFT five times (Switch the StickyKeys either on or off)
• NUM LOCK for five seconds (Switch the ToggleKeys either on or off)
• Windows Logo +U (Open Utility Manager)
Back to the top
Windows Explorer keyboard shortcuts
• END (Display the bottom of the active window)
• HOME (Display the top of the active window)
• NUM LOCK+Asterisk sign (*) (Display all of the subfolders that are under the selected folder)
• NUM LOCK+Plus sign (+) (Display the contents of the selected folder)
• NUM LOCK+Minus sign (-) (Collapse the selected folder)
• LEFT ARROW (Collapse the current selection if it is expanded, or select the parent folder)
• RIGHT ARROW (Display the current selection if it is collapsed, or select the first subfolder)
Back to the top
Shortcut keys for Character Map
After you double-click a character on the grid of characters, you can move through the grid by using the keyboard shortcuts:
• RIGHT ARROW (Move to the right or to the beginning of the next line)
• LEFT ARROW (Move to the left or to the end of the previous line)
• UP ARROW (Move up one row)
• DOWN ARROW (Move down one row)
• PAGE UP (Move up one screen at a time)
• PAGE DOWN (Move down one screen at a time)
• HOME (Move to the beginning of the line)
• END (Move to the end of the line)
• CTRL+HOME (Move to the first character)
• CTRL+END (Move to the last character)
• SPACEBAR (Switch between Enlarged and Normal mode when a character is selected)
Back to the top
Microsoft Management Console (MMC) main window keyboard shortcuts
• CTRL+O (Open a saved console)
• CTRL+N (Open a new console)
• CTRL+S (Save the open console)
• CTRL+M (Add or remove a console item)
• CTRL+W (Open a new window)
• F5 key (Update the content of all console windows)
• ALT+SPACEBAR (Display the MMC window menu)
• ALT+F4 (Close the console)
• ALT+A (Display the Action menu)
• ALT+V (Display the View menu)
• ALT+F (Display the File menu)
• ALT+O (Display the Favorites menu)
Back to the top
MMC console window keyboard shortcuts
• CTRL+P (Print the current page or active pane)
• ALT+Minus sign (-) (Display the window menu for the active console window)
• SHIFT+F10 (Display the Action shortcut menu for the selected item)
• F1 key (Open the Help topic, if any, for the selected item)
• F5 key (Update the content of all console windows)
• CTRL+F10 (Maximize the active console window)
• CTRL+F5 (Restore the active console window)
• ALT+ENTER (Display the Properties dialog box, if any, for the selected item)
• F2 key (Rename the selected item)
• CTRL+F4 (Close the active console window. When a console has only one console window, this shortcut closes the console)
Back to the top
Remote desktop connection navigation
• CTRL+ALT+END (Open the Microsoft Windows NT Security dialog box)
• ALT+PAGE UP (Switch between programs from left to right)
• ALT+PAGE DOWN (Switch between programs from right to left)
• ALT+INSERT (Cycle through the programs in most recently used order)
• ALT+HOME (Display the Start menu)
• CTRL+ALT+BREAK (Switch the client computer between a window and a full screen)
• ALT+DELETE (Display the Windows menu)
• CTRL+ALT+Minus sign (-) (Place a snapshot of the entire client window area on the Terminal server clipboard and provide the same functionality as pressing ALT+PRINT SCREEN on a local computer.)
• CTRL+ALT+Plus sign (+) (Place a snapshot of the active window in the client on the Terminal server clipboard and provide the same functionality as pressing PRINT SCREEN on a local computer.)
Back to the top
Microsoft Internet Explorer navigation
• CTRL+B (Open the Organize Favorites dialog box)
• CTRL+E (Open the Search bar)
• CTRL+F (Start the Find utility)
• CTRL+H (Open the History bar)
• CTRL+I (Open the Favorites bar)
• CTRL+L (Open the Open dialog box)
• CTRL+N (Start another instance of the browser with the same Web address)
• CTRL+O (Open the Open dialog box, the same as CTRL+L)
• CTRL+P (Open the Print dialog box)
• CTRL+R (Update the current Web page)
• CTRL+W (Close the current window)
အေသးစိတ္ကိုေတာ့ ေအာက္မွာ direct link ကုိေတာ့ညႊန္းထားေပးပါတယ္။
http://support.microsoft.com/kb/301583
http://www.microsoft.com/enable/products/KeyboardSearch_xp.aspx
http://www.helpwithpcs.com/tipsandtricks/keyboard_shortcuts_windows_xp.htm
ဒါက vista သံုးစြဲသူေတြအတြက္ပါ။ကၽႊန္ေတာ္၇ွာတင္ေပးတဲ့ short cuts keys မ်ားကို အနည္းငယ္ေလာက္ ဘာသာၿပန္စနစ္ နဲ႔ၿပန္ပီးေတာ့ သံုးစြဲၾကည့္ပါ။အေရးပါလားလုိ႔ေမးလွ်င္ အေသးစိတ္ ေလ့လာမယ့္သူေတြ အတြက္ေတာ့ အထိုက္အေလွ်ာက္ေတာ့ အသံုးဝင္ေစမွာပါ။
F1 Start Help (supported in most applications).
F2 Rename selected icon or file in Windows Explorer or on the Desktop.
F3 Open Search (in Windows Explorer or on the Desktop only).
F4 Open a drop-down list (supported in many dialog boxes). For example, press F4 in a File Open dialog to drop down the Look In list.
F5 Refresh the view in Windows Explorer, on the Desktop, in the Registry Editor, and some other applications.
F6 Move focus between panes in Windows Explorer.
F10 Send focus to the current application’s menu.
Miscellaneous Keys
Shortcut Key Function(s)
Arrow Keys Basic navigation – move through menus, reposition the text cursor (insertion point), change the file selection, and so on.
Backspace Move up one level in the folder hierarchy (Windows Explorer only).
Delete Delete selected item(s) or selected text.
Down arrow Open a drop-down listbox.
End Go to end of line when editing text, or to the end of file list.
Enter Activate highlighted choice in menu or dialog box, or insert a carriage return when editing text.
Esc Close dialog box, message window, or menu without activating any choice (usually the same as clicking Cancel).
Home Go to beginning of line (when editing text), or to the beginning of file list.
Page Down Scroll down one screen.
Page Up Scroll up one screen.
PrintScreen Copy entire screen as a bitmap to the Clipboard.
Space Bar Toggle a checkbox that is selected in a dialog box, activate the command button with the focus, or toggle the selection of files when selecting multiple files with Ctrl.
Tab Move focus to next control in a dialog box or window (hold Shift to go backward).
Alt Key Combinations
Shortcut Key Function(s)
Alt Send focus to the menu (same as F10). Also turns on the menu in applications where it is no longer used by default, such as Windows Explorer and Internet Explorer.
Alt-x Activate menu or dialog control, where letter x is underlined (if the underlines are not visible, pressing Alt will display them).
Alt-double-click (on icon) Display Properties sheet.
Alt-Enter Display Properties sheet for selected icon in Windows Explorer or on the Desktop. Also switches command prompt between windowed and full-screen display.
Alt-Esc Drop active window to bottom of pile, which, in effect, activates next open window.
Alt-F4 Close current window; if Taskbar or Desktop has the focus, exit Windows.
Alt-hyphen Open the current document’s system menu in a multiple document interface (MDI) application.
Alt-numbers When used with the numbers on the numeric keypad only, inserts special characters corresponding to their ASCII codes into many applications. For example, press the Alt key and type 0169 for the copyright symbol. Check characters map for full list of codes.
Alt-PrintScreen Copy active window as a bitmap to the Clipboard.
Alt-Shift-Tab Same as Alt-Tab, but in the opposite direction.
Alt-Space Bar Open the current window’s system menu.
Alt-Tab Switch to the next running applicationhold Alt while pressing Tab to cycle through running applications.
Alt-M When the Taskbar has the focus, minimize all windows and move focus to the Desktop.
Alt-S When the Taskbar has the focus, open the Start menu.
Ctrl Key Combinations
Shortcut Key Function(s)
Ctrl-A Select all; in Windows Explorer, selects all files in the current folder. In word processors, selects all text in the current document.
Ctrl-Alt-x User-defined accelerator for a shortcut, in which x is any key.
Ctrl-Alt-Delete Show the logon dialog when no user is currently logged on; otherwise, switch to the Windows Security dialog, which provides access to Task Manager and Log Off, as well as switching to another user, allowing you to change your password or lock the computer. Use Ctrl-Alt-Delete to access the Task Manager when Explorer crashes or your computer becomes unresponsive.
Ctrl-arrow key Scroll without moving selection.
Ctrl-click Use to select multiple, noncontiguous items in a list or in Windows Explorer.
Ctrl-drag Copy a file.
Ctrl-End Move to the end of a document (in many applications).
Ctrl-Esc Open the Start menu; press Esc and then Tab to move focus to the Taskbar, or press Tab again to move focus to the Taskbar, and then cycle through the toolbars on the Taskbar every time you press Tab.
Ctrl-F4 Close a document window in an MDI application.
Ctrl-F6 Switch between multiple documents in an MDI application. Similar to Ctrl-Tab; hold Shift to go in reverse.
Ctrl-Home Move to the beginning of a document (in many applications).
Ctrl-Space Bar Select or deselect multiple, noncontiguous items in a listbox or in Windows Explorer.
Ctrl-Tab Switch among tabs in a tabbed dialog or Internet Explorer; hold Shift to go in reverse.
Ctrl-C Copy the selected item or selected text to the Clipboard. Also interrupts some command prompt applications.
Ctrl-F Open Search (in Windows Explorer or on the Desktop only).
Ctrl-V Paste the contents of the Clipboard.
Ctrl-X Cut the selected item or selected text to the Clipboard.
Ctrl-Z Undo; for example, erases text just entered, and repeals the last file operation in Windows Explorer.
Shift Key Combinations
Shortcut Key Function(s)
Shift While inserting a CD, hold to disable AutoPlay.
Shift-arrow keys Select text or select multiple items in a listbox or in Windows Explorer.
Shift-click Select all items between currently selected item and item on which you’re clicking; also works when selecting text.
Shift-click Close button Close current folder and all parent folders (Windows Explorer in single-folder view only).
Shift-Alt-Tab Same as Alt-Tab, but in reverse.
Shift-Ctrl-Tab Same as Ctrl-Tab, but in reverse.
Shift-Ctrl-Esc Open the Task Manager.
Shift-Delete Delete a file without putting it in the Recycle Bin.
Shift-double-click Open folder in two-pane Explorer view.
Shift-Tab Same as Tab, but in reverse.
Windows Logo Key (WIN) Combinations
Shortcut Key Function(s)
WIN Open the Start menu.
WIN-Tab If the Aero interface is active, this activates Windows Flip 3D.
WIN-Pause/Break Display System Control Panel applet.
WIN-Space bar Display the Sidebar.
WIN-D Minimize all windows and move focus to Desktop.
WIN-E Start Windows Explorer.
WIN-F Launch Search.
Ctrl-WIN-F Search for a computer on your network (requires Active Directory).
WIN-L Lock computer, requiring password to regain access.
WIN-M Minimize current window.
Shift-WIN-M Undo minimize current window.
WIN-R Display Run dialog.
WIN-U Open the Ease of Access Center.
ဒါက vista window short cut keys မ်ားေလ့လာဖုိ႔အတြက္ပါ။
http://www.nerdgrind.com/windows-vista-shortcut-keys/
http://www.mydigitallife.info/2007/04/08/complete-list-of-windows-vista-keyboard-shortcuts-hot-keys-or-accelerators/
ၿပီးလွ်င္ linux window ကုိေတာ့ လက္၇ိွမသံုးဖူးေပးမယ့္ ကၽႊန္ေတာ္လည္း google ကေန၇ွာေဖြရသမွ်ကေတာ့ ခ်ၿပထားေပးပါတယ္။
http://linux.about.com/od/linux101/l/blnewbie5_1.htm
http://www.keyxl.com/aaae677/56/Linux-Gnome-Window-Manager-keyboard-shortcuts.htm
ေလ့လာရင္း ေပ်ာ္၇ႊင္ပါေစဗ်ာ သူငယ္ခ်င္း။
ဒီပို႔စ္ကို PDF FILE လုိခ်င္ရင္

ကၽႊန္ေတာ္တို႔ေတြ ကြန္ပ်ဴတာေတြ သံုးၾကပါတယ္။အသံုးက်ယ္လာသည္ ႏွင့္အမွ် softwares မ်ားဆုိလွ်င္ လည္းဆို မဟုတ္လည္း သီၿခား os version ၿမင့္လာတာေလးေတြႏွင့္ အမွ် os အသစ္ေတြ ထပ္တင္ ခ်င္ၾကလာပါတယ္။အေၾကာင္းေၾကာင္းေၾကာင့္ ဝင္းဒိုးစနစ္ေတြ ပ်က္စီးလာႏုိင္ပါတယ္။အဲ့လို ပ်က္စီးလာသည္ ႏွင့္အမွ် အသစ္ၿပန္တင္လုိက္တာနဲ႔ ခ်ိတ္ဆက္ထားတဲ့ ပစၥည္းေတြရဲ႕ driver softwares မ်ားလည္း အကုန္ ပ်က္လာပါတယ္။အဲ့အတြက္လည္း ဘယ္လုိ ဟက္ဝဲလ္ပစၥည္းအမ်ိဳးအစား မ်ားႏွင့္ ဘယ္လုိ driver softwares မ်ားသံုးထားတယ္ဆုိတာ သိမွ ၿပန္တင္ႏုိင္ပါတယ္။ဒီလုိသိေအာင္လည္း Microsoft ကေန window os စနစ္မွာ start/control panel/system box ကုိဖြင့္ၿပီး hardware device manager မွာ details အေသးစိတ္ အလုိက္ၾကည့္ၾကပါတယ္။ဒါေတြက သိၿပီးသားေလာက္ေတြပါ။အဲ့လုိမွမၾကည့္လည္း cmd ေခါက္ၿပီး systeminfo လုိ႔၇ုိက္ၿပီး ၾကည္ပါ။ဒီ setting ပုိင္းကေၿပာင္းလည္း ၿပင္ဆင္လို႔မ၇တာကို အ၇င္ကလည္း ေ၇းေပးခဲ့ထူးပါတယ္။တစ္ခ်ိဳ႕ user မ်ားက cpu info ေတြေၿပာင္းတက္တာကိုး။ဒီပိုင္းေတြလည္း ေရးေပးခဲ့ပီးပီၿဖစ္ပါတယ္.ဒီထက္ပို အေသးစိတ္သိခ်င္လွ်င္ internet and web site ကေန အခမဲ့ယူႏုိင္တဲ့ free ware software တစ္ခု rename က Everest home edition protable တစ္ခုေလာက္ လမ္းညႊန္ၿပပါရေစ။သုိ႔မဟုတ္လည္း www.drhardware.com မွာလည္း ၾကည့္လုိ႔ရပါတယ္။ဒီေတာ့ everesthome220 ကုိ free ware ဆိုေတာ့ direct link သာလမ္းညႊန္လုိက္မယ္။sever link ႏွစ္လင့္ကေန ၾကိဳက္တာေဒါင္းယူလိုက္ပါ။Home edition ဆုိတာ အိမ္သံုးပါ။
http://www.softpedia.com/progDownload/Everest-Home-Edition-Download-16369.html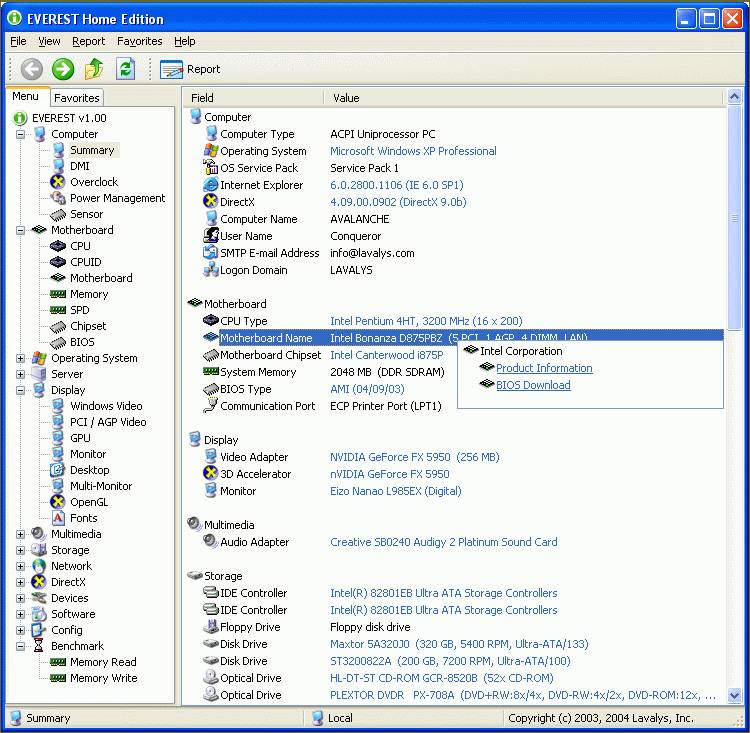
ကြန္ပ်ဴတာစက္ထဲက ပစၥည္းတစ္ခုခ်င္းဆီရဲ႕အေၾကာင္းကို အေသးစိတ္ေဖာ္ၿပႏုိင္စြမ္း၇ိွတဲ့ everesthome220 ဆိုတဲ့ေဆာ့ဝဲလ္ကို မိတ္ဆက္ေပးလုိက္တာပါ။အဆုိပါ software သည္ system summary ကအစ processor,Bios,PCI,AGP,Memory,Usb and Networdk,etc အစ၇ိွေသာ hardware ပိုင္းပစၥည္းမ်ားရဲ႕ အေသးစိတ္ကိုေဖာ္ၿပေပးမွာ ၿဖစ္သလို printer/ monitor and other external hard ware devices အေၾကာင္းေတြကုိ လည္းသိႏုိင္ပါတယ္။ထုိ႔အၿပင္ window os စနစ္ႏွင့္အတူ အဆိုပါ os window မွာ installation လုပ္ထားေသာ application programs (softwares) မ်ားကိုလည္း အေသးစိတ္ details အလုိက္ေဖာ္ၿပေပးမွာ ၿဖစ္ပါတယ္။Troubleshooting and Help os setting ပုိင္းေတြက အေထာင့္အပံ့ၿပဳေပး ေပမယ့္လည္း everesthome220 ေဆာ့ဝဲလ္က တနည္းနည္းနဲ႔ေတာ့ အေထာင့္အပံၿပဳေစမွာ ၿဖစ္ပါတယ္။တစ္ခု ၿခင္းဆီကိုေတာ့ details sheet gram အလိုက္ေတာ့ ခ်မေရးၿပေတာ့ပါဘူး။အသံုးတည့္ပါေစ။
တစ္ေန႔က ညီတစ္ေယာက္ g talk ကေန ေမးလာတယ္ေလ။အစ္ကုိတဲ့ window os ၿဖစ္စဥ္မ်ားကို သိခ်င္လုိ႔ပါတဲ့။အ၇ုိး၇ွင္းဆံုး ေၿပာ၇၇င္ေတာ့ ကၽႊန္ေတာ္လည္း Microsoft ပိုင္၇ွင္ဘီလ္ဂိတ္လည္း မဟုတ္ေတာ့ အဲ့ေတာ့ ရွာေတာ့တင္ေပးလုိက္တယ္။Question and Ans.. မ်ားကေနေပါ့ computer journals တစ္ခုပါဘဲ ခုႏွစ္ေတာ့ မမွတ္မိေတာ့ဘူး။အဲ့ေတာ့ သူလည္း ဖတ္လုိ႔လြယ္ကူေအာင္ pdf ပါ တစ္ခါတည္း ထုတ္ေပးလုိက္တယ္။ဒါေတြက သိသင့္လားေမးလာလွ်င္ေတာ့ ကြန္ပ်ဴတာစိတ္ဝင္စားမွဳဆုိတာ high level and lower level လို၇ိွပါတယ္။High level ဆုိတာက ကၽႊန္ေတာ္တုိ႔လို လူမ်ိဳးေတြပါ ကၽႊန္ေတာ္သူငယ္ခ်င္းေတြ ထဲမွာလည္း ပါရင္ပါမွာေပါ့ ဂိမ္းထက္စြဲတယ္ေလ။အားေန၇င္ ေဆာ့ဝဲလ္ေလးေကာင္းတာေလး ရွာကိုရွာလုိက္ရ မွ မဟုတ္လည္း တၿခားဆိုဒ္ေတြကေန စာေတြလုိက္ဖတ္တယ္ေလ ကိုယ္လည္း စာဖတ္ဝါသနာ ပါသူဆုိေတာ့ အံကိုက်ေရာ။အဲ့လို ကြန္ပ်ဴတာကို ဝါသနာပါ စိတ္ဝင္စားသူေတြဆို အားေပးပါတယ္။ဒီလုိပဲ ကြန္ပ်ဴတာက အစပိုင္းစိတ္ဝင္စားပီး နည္းနည္းသိလာသည္ႏွင့္အမွ် နယ္ပယ္က်ယ္ဝန္းစြာ သိလာခ်င္တယ္။Information environment ဝန္းက်င္ကလည္း technical ပိုင္းေတြက က်ယ္ၿပန္႔တာကိုး။ကြန္ပ်ဴတာဆုိတဲ့ နည္းပညာက ေလ့လာမယ္ဆို ကုန္တယ္လုိ႔ေတာ့ မ၇ိွဘူး သူ႔ပုိင္ရာေလးေတြေပါ့ hard ware ပုိင္းေတြဝါသနာ ပါသူ၇ိွသလို application programs ပိုင္းေတြမွ လက္ကလိခ်င္သူေတြလည္း ပါရင္ပါမွာေပါ့ တစ္ခ်ိဳ႕ကလည္း programmer ပုိင္းေတြ တစ္ခ်ိဳ႕က network ပုိင္းေတြ အစ၇ိွသၿဖင့္ေပါ့။ကၽႊန္ေတာ့္ကို လာေမးလွ်င္ ဘယ္ပုိင္းကိုဝါသနာ ပါလည္းေပါ့ ဒီလိုဆုိလာလ်ွင္ေတာ့ ကၽႊႏ္ေတာ္ကေတာ့ hardware ပိုင္းကို ပိုအားသန္တယ္လို႔ေတာ့ ေၿဖမိမွာပဲ ၿပီးေတာ့ application programs and programming ပုိင္းေတြပါ(အဲ့ပို္င္းကေတာ့ နည္းပါတယ္)အထူးသၿဖင့္ ဒီလိုပါဘဲ တက္ႏုိင္သေလာက္ေတာ့ ၿဖည့္၇တာပဲ။ပညာဆုိတာ ဆံုးတယ္လုိ႔မွမ၇ိွတာ ဒါက high level သမားေတြပါ။Lower level learning သမားေတြကေတာ့ ဒီလိုဘဲ နည္းနည္းပါးပါးစိတ္ဝင္စား သူေတြေပါ့။သူတို႔က ဘာေတြစိတ္ဝင္စားတက္သလည္း ဆုိလွ်င္ အထူးသၿဖင့္ ကၽႊန္ေတာ္ထင္တာေပါ့ ဟုတ္ခ်င္မွလည္း ဟုတ္မွာေပါ့ေလ သူတို႔ေတြက အလွအပအဆန္းေလးေတြမွ အထူးသၿဖင့္ slide show ေလးလုပ္လိုက္၇မွ မဟုတ္လည္း ulead ေလးကုိင္လုိက္၇မွ။ကဲပါ ဒီမွာေလ၇ွည္သြားတယ္ အဲ့ေအာင့္မွာ window os version အလုိက္ month and year details အလုိက္ၿပထားေပးတယ္ ဖတ္ၾကည့္လိုက္ပါ။
- 1983 November Microsoft Windows
- 1985 November Microsoft Windows 1.0
- 1987 December Microsoft Windows 2.0
- 1987 December Microsoft Windows/386
- 1988 June Microsoft Windows/286
- 1990 May Microsoft Windows 3.0
- 1991 October Microsoft Windows 3.0a
- 1992 April Microsoft Windows 3.1
- 1992 October Microsoft Windows for Workgroups 3.1
- 1993 August Microsoft Windows NT 3.1
- 1993 April Microsoft Windows
- 1994 February Microsoft Windows for Workgroups 3.11
- 1994 September Microsoft Windows NT 3.5
- 1995 June Microsoft Windows NT 3.51
- 1995 August Microsoft Windows 95
- 1996 August Microsoft Windows NT 4.0
- 1996 November Microsoft Windows CE 1.0
- 1997 November Microsoft Windows CE 2.0
- 1998 June Microsoft Windows 98
- 1998 July Microsoft Windows CE 2.1
- 1999 May Microsoft Windows 98 SE (Second Edition)
- 1999 Microsoft Windows CE 3.0
- 2000 February Microsoft Windows 2000
- 2001 October Microsoft Windows XP Home Edition & Professional
- 2002 September Microsoft Windows XP SP1
- 2003 February Microsoft Windows XP SP1a
- 2003 March Microsoft Windows Server 2003
- 2004 August Microsoft Windows XP SP2
- 2006 Nov, 2007 Jan Microsoft Windows Longhorn
ဂ်ာနယ္က စာမူတုိင္းပဲ ကၽႊန္ေတာ္ကေတာ့ ေရးခ်ၿပေပးလုိက္ေတာ့တယ္။ယခု အခ်ိန္မွာေတာ့ Microsoft widnwo xp os ကိုသံုးေနၾကပီး internet,explorer 7,microsof office 2007 and window media player 11 တုိ႔ဟာ Microsoft company အၿမင့္ဆံုး version မ်ားၿဖစ္ပါတယ္။မွတ္ခ်က္ ဒီခတ္အေနထားဆုိ လွ်င္ဒါေတြက ခတ္ေဟာင္း version အေနထားေလာက္ကို ေရာက္ေနေလာက္ပါပီ။အဆုိပါ Microsoft window xp ၇ဲ႕ price က dollar $150 and $300 ေက်ာ္ေက်ာ္ၾကားလို႔ေတာ့ေရးထားတာပဲ။ဝင္းဒိုး os စနစ္မတုိင္မီ Dos(disk operating system) စန္စဆုိပါေတာ့။1981 ခုႏွစ္ေလာက္က စတင္ၿပီး MS-Dos 1.0 နဲ႔ ကြန္ပ်ဴတာ ေဆာ့ဝဲလ္ကမၻာၾကီးေတြကို ဝင္ေ၇ာက္ခဲ့တဲ့ Microsoft company ဟာ အၾကီးအက်ယ္ကို famous ေက်ာ္ၾကားခဲ့တယ္ ပဲဆုိထားတယ္။1994 ေလာက္မွာ Ms-Dos စနစ္မ်ားကို ထုတ္လုပ္ခဲ့ၿပီး ဝင္းဒိုးစနစ္သို႔ ကူးေၿပာင္းလာခဲ့ပါတယ္။ဒါကေတာ့ ကၽႊန္ေတာ္သိသေလာက္ နည္းနည္း ၇ွင္းၿပတာပါ။A++ စာအုပ္မွာ ဖတ္ဖူးတာကေတာ့ Ms Dos စနစ္ဆုိတာ လက္၇ိွ os မွာ command prompt ကို run box ကေန cmd ၇ိုက္ထည့္ၿပီးေခၚတာေလ အဲ့စနစ္ပါ။ခုေနာင့္ပိုင္းမွ window ကို gui (graphic user interface) ဆိုတာပါ။ဒါက သိသမွ်ပါ။ေနာင့္ပိုင္း Microsoft window currents version မ်ားကို သိခ်င္လွ်င္ေတာ့ ေအာင့္မွာ ကၽႊန္ေတာ္ link တစ္လင့္ကိုေတာ့ ညႊန္းထားေပးပါတယ္။လက္တေလာေတာ့ သိၿပီးသား လူေတြကေတာ့ မ်ားေလာက္ပါတယ္။ကၽႊန္ေတာ္မေၿပာခင္က ကိုက သိႏွင့္ေနေလာက္ပါပီ။သိၿပီးသား သူငယ္ခ်င္းမ်ားကလည္း ႏွစ္ခါသိတယ္လုိ႔ေတာ့ မွတ္ထားေပးေပါ့။စာေ၇းတာ အားနည္းခ်က္ပါ၇င္ေတာ့ နားလည္းေပးပါ။ေက်းဇူး တင္ပါတယ္။
http://en.wikipedia.org/wiki/List_of_Microsoft_Windows_versions
ဒီပို႔စ္ကို PDF FILE လုိခ်င္ရင္
ဒီလုိဗ်ာ ကြန္ပ်ဴတာ မွာၿဖစ္ေလ့ၿဖစ္ထရိွတဲ့ hard disk spacing gb ပိုယူတဲ့ၿပသာနာ၇ယ္ ေနာင့္တစ္ခ်က္က window os တစ္ခုကိုတက္လာတာနဲ႔ desktop ေပၚလာပီး စကၠန္႔ဝက္ေလာက္ အလုပ္မလုပ္ေသးဘဲ start up time ၾကာၿမင့္တဲ့ အခ်က္ေတြေပါ့ဗ်ာ။စဥ္းစားၾကည့္တယ္ ဘာေၾကာင့္အဲ့လိုၿဖစ္တာလည္းေပါ့။အ၇င္ကလည္း window startup time delay ဆုိၿပီး software တစ္ခု သံုးၿပေပးဖူးတယ္။ခုက rub box ကေန msconfig လုိ႔၇ိုက္ပီး Start Up pop menu က application programs မ်ားကို dis check ေတြေပးၿပီး restart os လုပ္လိုက္ၾကတယ္။ဒီေကာင့္ကို dis check ေပးလုိက္ၿခင္းသေဘာက window os စဖြင့္လို႔ desktop screen စတက္လာတာနဲ႔တစ္ခ်ိဳ႕ဆို desktop ကို r click ေတာင္ refresh မေပး၇ေသးဘူး g talk တုိ႔ vzo တို႔က ပြင့္ေနပီ။အလားတူ တက္တဲ့ programs မ်ားကို start up pop menu မွာ dis check and checking ေပးလုိက္ၿခငး္ႏွင့္သက္ဆိုင္ပါတယ္။သုိ႔မဟုတ္လည္း All programs to start up folder က programs ေတြကို delete ေပးလုိက္လည္း သေဘာပါဘဲ။အေသခ်ာဆံုးကေတာ့ msconfig ကၿဖဳတ္လုိက္ၿခင္းသေဘာပါ။ေနာင့္ အလားတူ တစ္ဟက္ဒစ္ေပၚမွာ ၿဖစ္တက္တဲ့
ဥပမာ ဝင္းဒိုး တင္ထားတဲ့ window partition c အခန္းမွာ window os 7 တင္ထားတဲ့အတြက္ system files မ်ားကို အားလံုး ctrl + A နဲ႔ select ဆြဲၿပီး r click ေပး properties ကိုေထာင့္ၾကည့္လုိက္တာ size 15.2gb ဒီဖုိလ္ဆုိဒ္က 15.2gb ရိွတယ္ ဒါေပမယ့္ ဟက္ဒစ္လ္ clusters အခန္းမ်ားမွာ ယူတဲ့ size on disk က 15.4 ရိွတယ္ ဒါကတစ္ခ်က္ ေနာင့္တစ္ခ်က္က ဒါက window system files မ်ားကို local disk partition c အခန္းကေန r click ေပးၿပီး properties ကေနၾကည့္လုိက္တာ အသံုးၿပဳၿပီးတဲ့ disk space က 15.7 ေတာင္၇ိွတယ္။ဒါေတြက ဘာေၾကာင့္ကြဟသြားတာလည္း?သိသေလာက္ေပါ့ ကၽႊန္ေတာ္တို႔ os မွာ system restore ေတြလုပ္ၾကတယ္ေလ။အ၇င္ကလည္း ဒီ setting အေၾကာင္းကုိေ၇းေပးဖူးတယ္။Window ကုိ default ၿပန္ေခၚတာ restore hard disk point backup မ်ားအလုိက္ေပါ့။ဒီေကာင္ေတြက hard disk ေပၚမွာ back up points မ်ားလိုက္မွတ္ေပးတာ။အဲ့ေတာ့ backup points မ်ားမ်ားလာသည္ႏွင့္အမွ် အဆိုပါ hard disk free space ယူနူန္းေတြ က်ဥ္းေၿမာင္းလာသလို အေပၚက ကၽႊန္ေတာ္ေၿပာတဲ့အတုိင္း ကြာ ဟမွုေတြၿဖစ္လာတယ္။အဲ့ေတာ့ system restore points မ်ားကို ဖ်က္နည္းနဲ႔ turn off disable ေပးလုိက္မယ္ဆုိလွ်င္ အဆင္ေၿပပါတယ္။ဒီေတာ့ turn off ပုိင္းကေန စေ၇းသားပါ့မယ္။W7 ကုိအေၿခခံၿပီးေ၇းသားတဲ့အတြက္ xp သမ်ားမ်ားကလည္း ဒီနည္းနဲ႔ မကြာဟပါဘူး။လိုက္လုပ္ၾကည့္ပါ။
My computer ကို r click ေပးၿပီး properties ကေန Advanced system settings ကေန သြားလုိက္ပါ။အေပၚက System Properties box တက္လာတာနဲ႔ System Protection ကုိသြားလိုက္ပါ။ကၽႊန္ေတာ္က အဆုိပါ setting ပုိင္းကို turn off ေပးမည္ၿဖစ္တဲ့အတြက္ Configure.. ကိုသြားလုိက္ပါ။ၿပီးလွ်င္ ကၽႊန္ေတာ္ၿပေသာ Turn off system protection ကိုေပးလုိက္ပါ။check ေပးလုိက္ၿခင္းသေဘာပါ။ၿပီးလွ်င္ Ok ကုိသြားပါ။Apply and ok ကိုဆက္လုပ္ပါ။ဒါဆို fri တို႔ရဲ႕စက္မွာ ဒီ system restore ပုိင္းကုိ အေပၚက ကၽႊန္ေတာ္ၿပထားတဲ့ အတိုင္းေခၚလည္း၇သလို သို႔မဟုတ္လည္း start men search box ကေန system restore ကုိေခၚေခၚ မဟုတ္လည္း run ကေန msconfig ကုိ၇ိုက္ေခၚေခၚ
ကၽႊန္ေတာ္ၿပထားတဲ့ system restore setting ကို window က tun off လုပ္ထားသည္ ၿဖစ္တဲ့အတြက္ ဆက္လက္လုပ္ေဆာင္လုိ႔မ၇မွာ ၿဖစ္သလို ကၽႊန္ေတာ္ေၿပာသလို hard disk ေပၚမွာ system files မ်ားအၿပင္ မလုိအပ္တဲ့ window backup points မွတ္ထားမွု ၇ိွေတာ့မွာမဟုတ္ေတာ့ပါဘူး။ေနာင့္တစ္ခ်က္ စဥ္းစား၇မွာက ဒီလို backup points က်န္၇ိွေသာ restore points မ်ားကို ဘယ္လုိဖ်က္ၾကမွာလည္း?
1. Click Start, type Cleanmgr.exe and press ENTER2. Select the drive-letter from the list and click OK3. Click Clean up system filesThis restarts Disk Cleanup to run in elevated mode.4. Select the drive-letter from the list and click OK5. Click the More Options tab အဲ့တုိင္းလုပ္ၾကည့္လုိက္ပါ။ၿပထားေသာ Clean up လုပ္လုိက္ပါ။Yes ေပးလုိက္ပါ။ေနာင့္တနည္းက hard disk မွာ disk clean up လုပ္တဲ့နည္းပါ။အဆုိပါ လုပ္လုိက္သည္ႏွင့္အမွ် window os မွာ မလုိအပ္ေသာ temporary files မ်ား ပ်က္သြားမွာၿဖစ္သလို memory dump files ေတြနဲ႔ သီၿခား မလုိအပ္တဲ့ hard disk clusters အခန္းမ်ားကို ရွင္းလင္းေပးသည္ ၿဖစ္တဲ့အတြက္ free space တုိးလာမွာ ၿဖစ္ပါတယ္။ဒါကေတာ့ အေပၚကၿပထားသလုိပဲ run box ကေန Cleanmgr.exe လုိ႔ရိုက္ထည့္ပါ။ေနာင့္တစ္နည္းက run box ကေန ဒါေတြကေတာ့ သိၿပီးသားေလာက္ေတြပါ။temp/prefetch/%temp and recent တုိ႔ၿဖစ္ပါတယ္။ပိုေကာင္းတာ က c cleaner သံုးခ်လုိက္ၿခင္းပါ။ဒါေတြက အေပၚဆံုးက ပတ္သတ္တဲ့အခ်က္လက္ေတြကို ရွင္းလင္းတာ ၿဖစ္ပါတယ္။ေနာင့္တစ္ခ်က္က window စစတက္ၿခင္း start up desktop sreen ၿမင္၇ပီး ဘာေၾကာင့္ time delay ၾကန္႔ၾကာေနတာလည္း။ဝင္းဒိုးအတက္ေနွးတာနဲ႔ ပတ္သတ္ၿပီးေပါ့။Run box ကေန msconfig လို႔ရိုက္ၿပီး Start up setting ေတြက check ေတြကိုၿဖဳတ္ေပးလုိက္ပါ။အဆိုပါ window စစတက္ၿခင္းေပၚလာေသာ g talk တို႔ application programs မ်ားမလုိအပ္ပဲ လုပ္ေဆာင္မွဳကေန ကင္းေဝးသြားမွာ ၿဖစ္ပါတယ္။ဘယ္လုိၿဖစ္ၿဖစ္ knowledge တစ္ခုေအာင္လုပ္ေပးပါ။Cleaner အသံုးခ်ပံုေအာင္ကလင့္ကေန ဖတ္လုိက္ပါ။ေပ်ာ္ရႊင္ပါေစ fri၊
http://www.phoothar3.co.cc/2010/07/ccsetup233-portable-extract-here-double.html
ဒီပို႔စ္ကို PDF FILE လုိခ်င္ရင္

ဒီအေၾကာင္းကို ေရးခ်င္ေနတာ ၾကာပါပီ။ကိုယ္တုိင္လည္း မစမ္းေသးတာနဲ႔ မလုပ္ၿဖစ္ေသးတာပါတာပါ။English language ကႊ်မ္းက်င္သူတို႔ language ကိုစိတ္ဝင္စားတဲ့ လူေတြ အတြက္ အဆင္ေၿပလိမ့္မယ္ထင္ပါတယ္။ ကိုယ့္ကြန္ပ်ဴတာကို ear phone နဲ႔ audio command ေပးတယ္ပဲဆို၇ပါ့မယ္။လက္၇ိွ window 7 သံုးခုိက္ဆိုေတာ့ window 7 မွာက အားသာခ်က္ေတြ security ပိုင္းေတြ ေကာင္းတာေတြကေတာ့ သိၿပီးသား ေလာက္ေတြပါ။ဒါေပမယ့္ ေတာ္ေတာ္မ်ားမ်ားက window 7 and window vista မွာ speech and recognition အသံုးခ်ပံုကို သိၿပီးသားလူေတြ ၇ိွသလို မသိေသးေသာ သူငယ္ခ်င္းမ်ားလည္း ပါမွာပါ။သိၿပီးသား လူေတြလည္း reverse ေနာက္တေခါက္ ၿဖစ္သလို မသိေသးေသာ fri မ်ားလည္း knowledge ၇ေစမွာပါ။အရင္ဆံုး လုပ္နည္းကို window 7 မွာ movie file နဲ႔ you tube ကေန blogger page ေပၚသို႔ဆြဲတင္ေပးထားပါတယ္။ပထမ movie မွာ လုပ္နည္းကို ၿပထားေပးမွာ ၿဖစ္သလို ဒုတိယ movie မွာက ထို speech and recognition အသံုးခ်သြားပံုကို တင္ထားေပးတာၿဖစ္ပါတယ္။ၿပီးလွ်င္ အဆိုပါ speech and recognition commands မ်ားကို ဘယ္မွာ က်က္လို႔ရမလည္း?ေအာက္မွာ ဆက္လက္ေ၇းသားပါ့မယ္။
လုပ္နည္း
အားသာခ်က္
လက္တေလာ ကြန္ပ်ဴတာ os task bar start menu မွာ သတိထားမိလားေတာ့ မသိဘူး။ေတာ္ေတာ္မ်ားမ်ား 7 and vista သံုးသမားမ်ားက ၿဖဳတ္လိုက္တယ္ေလ။ဒီ tools ေလးကို Help and Support ကိုေလ သတိထား မိေလာက္မွာပါ။တစ္ခ်ိဳ႕က မ်က္စိေႏွာက္တယ္ ၇ူပ္တယ္ဆိုၿပီး အဆိုပါ system tools ကို group policy သို႔မဟုတ္လည္း start menu ကို r click ေထာင့္ၿပီး properties and Start Menu and Customize ကေန ၿဖဳတ္ေလ့၇ိွပါမယ္။ တကယ္လို႔ မပါသူေတြကလည္း အဲ့ပိုင္းမွာၿပန္ၾကည့္ေပးပါ။လက္တေလာ start menu ကေန Help and Support ကုိေခၚယူပီး search box မွာ speech and recognition ကုိ၇ိုက္ပီး၇ွာၿပီး commands မ်ားကို ၇ွာလုိက္ပါ။ေနာင့္တစ္ခ်က္က Help and Support ပိုင္းသည္ လက္၇ိွ os တစ္ခုတင္လိုက္တုိင္း Microsoft ကေန helper service သေဘာမ်ိဳးပါ။ကြန္ပ်ဴတာ စေလ့လာသူမ်ားအတြက္ အဲ့ settings ပုိင္းသည္ (ဥပမာဆို၇လွ်င္ အဆိုပါ setting ပုိင္းကေန how to change desktop background )ဆိုၿပီး ၇ိုက္ရွာလွ်င္ technologies ေတြ details အလုိက္က်လာမွာၿဖစ္ပါတယ္။လက္တေလာ speech and recognition အသံုးခ်ပံုႏွင့္ window os start menu က Help and Support tool အသံုးဝင္မွဳပိုင္းကို ေလ့လာေစခ်င္တာပါ။ေနာင့္ပိုင္း vista မွာ အသံုးခ်ပံုကို ဆက္လက္ေ၇းသားပါ့မယ္။ Complete the Speech Tutorial
1. In the Start Menu, choose All Programs, Accessories, Accessibility. Select the Speech Recognition option
2. Proceed through the initial set up screens to configure your microphone. The Speech tutorial will then be launched
3. Complete the Speech tutorial
ဒါက window vista မွာ အသံုးခ်သြားပံုပါ။တကယ္လုိ႔ အေသးစိတ္သိခ်င္လွ်င္ fri တုိရဲ႕ you tube broadcast self မွာ how to use speech and recognition in window vista လုိ႔ရိုက္ရွာလုိက္ပါ။အဆိုပါ အသံုးခ်မွဳ ေတြၿပီးတဲ့ေနာင့္မွာ window xp သမားမ်ားကေမးလာဖြယ္၇ိွပါတယ္။Xp မွာလည္း အသံုးခ်လုိ႔ရလား ဆိုတာပါ။ေအာက္က link မွာေလ့လာၾကည့္ပါ။ကၽႊန္ေတာ္လည္း ၾကားဖူးထားတာ ၇ိွတာပါ။လုပ္ၾကည့္ေလာက္ ေတာ့ 7 မွာေတာ့ အဆင္ေၿပပါတယ္။English language ကက်က္၇မွာ ခပ္ပ်င္းပ်င္းရယ္ဆုိေတာ့ မလုပ္ခ်င္ေတာ့ဘူးလို႔ ပဲဆုိ၇မွာေပါ့။ေပ်ာ္ရႊင္ပါေစခင္ဗ်ာ။စာေ၇းတာ အားနည္းခ်က္ အမွားပါခဲ့လွ်င္လည္း နားလည္ေပးပါ သူငယ္ခ်င္းမ်ား!Ps-ေအာက္က xp မွာ အသံုးခ်ေသာ ေပးထားေသာ လင့္သည္ myanmar family forum ကိုဒသာဂီရိ၇ွာေဖြထားေသာ link ၿဖစ္သည္။
http://www.microsoft.com/windowsxp/using/setup/expert/moskowitz_02september23.mspx
ဒီပို႔စ္ကို PDF FILE လုိခ်င္ရင္
ကၽႊန္ေတာ္ဖ်ားေနတာဗ်ာ ဒီလုိဘဲ ေက်ာင္းကတက္လုိက္နဲ႔ေပါ့ အခ်ိန္ကလည္းၾကာၾကီးပဲ တက္၇တာေလ။ဘယ္ လုိၿဖစ္ၿဖစ္ ေရးေလ့က်င့္၇ိွေတာ့ ဆက္ေ၇းခ်င္တယ္။ကိုကလည္း ဒါဝါသနာပါေတာ့ ၿဖစ္ခ်င္တာေတြလည္း ၇ိွတယ္ေလ။ေလ၇ွည္မေနေတာ့ဘူး။အဓိက သိသင့္ေလာက္မယ့္ အခ်က္ေတြပဲ ေရးပါ့မယ္။အရင္ကလည္း bios ပုိင္းေတြ ေရးေပးဖူးတယ္။ခုလည္း part 2 ကိုဆက္ေ၇းေပးမလို႔။Advanced bios features ပုိင္းေတြကို ဆက္လက္ေဆြးေႏြးၾက၇ေအာင္။သိသေလာက္ ေၿပာၿပေပးမယ္။Hard disk Boot Priority ဆိုတာက လက္၇ိွ hard disk ႏွစ္လံုးတပ္တယ္ဆုိပါေတာ့။တစ္လံုးမွာ os 7 တင္တယ္ တစ္လံုးမွာ xp တင္တယ္ဆိုပါေတာ့။ဆိုလုိတာက ဒီလို Boot Priority ဆိုတာက လက္၇ိွ ကြန္ပ်ဴတာကို စဖြင့္တယ္မဟုတ္လား။အ၇င္ဆံုး post utility လုိ႔ေခၚတဲ့ပိုင္းက ေနစလုပ္ေဆာင္ပါတယ္။ၿပီးလွ်င္ boot screen တက္လာတယ္။ဆုိလုိတာက အတံုးေလးေတြက်ၿပီး boot device ေ၇ႊးခ်ယ္တယ္ဆုိပါေတာ့/Boot device ဆုိတာဘယ္လုိလည္း?Hard disk and cd/dvd room မ်ားပါ။ဝင္းဒိုးတက္ဖို႔ဆုိလွ်င္ bios ပုိင္းမွာ Advanced bios features မွာသာ first boot device ကုိသာ cd room ေပးလွ်င္ ပံုမွန္ cd room ထဲမွာ window cd တစ္ခ်ပ္ကုိ ထည့္တားပါက installation လုပ္ဖုိ႔ setup လုပ္ေဆာင္သြားပါ့မယ္။Clean installation တင္တယ္လုိ႔ေခၚတယ္။ဘယ္ေနရာမွာ စေ၇ႊးတာလည္း?
ကြန္ပ်ဴတာကို စဖြင့္ဖြင့္ခ်င္း post utilityက ကဲ hard ware ပစၥည္းတုိ႔ေ၇ မင္းတို႔ရဲ႕ ပစၥည္းေတြ တပ္ဆင္တာ အံဝင္ရဲ႕လား သို႔မဟုတ္လည္း တစ္ခုခုလႊတ္တာ၇ိွလားဆုိၿပီး keyboard ကေန tab bar မေခါက္ခင္ေပါ့။ၿပီးမွ boot screen တက္ၿပီး boot device ကုိေ၇ႊးခ်ယ္ပါတယ္။၇ူပ္သြားလားေတာ့မသိဘူး။ဒီလို Hard disk Boot Priority ဆိုတာက hard disk ႏွစ္လံုးတပ္ထားမယ္ ဆုိလွ်င္ window 7 တင္ထားတဲ့ os ကတစ္လံုး window xp ကတင္ထားတဲ့ တစ္လံုးဆုိလွ်င္ ကုိယ့္တက္ေစခ်င္တဲ့ window os ကုိေရႊးခ်ယ္ေပး ဒါပီးမွ frist boot device မွာ hard disk ေပးထားမယ္ဆုိလွ်င္ Hard disk Boot Priority မွာေရႊးခ်ယ္လုိက္ေသာ os က boot screen မွာတက္ၿပီး window starting time နဲ႔အတူဝင္းဒိုးတက္သြားမွာ ၿဖစ္ပါတယ္။CD-Room Boot Priority ဆုိတာက ကၽႊန္ေတာ္ေၿပာသလိုပဲ cd room or dvd room ႏွစ္လံုးတပ္ထားမယ္။ကိုယ္ first boot device မွာသာ cd room ေပးထားမယ္ window os installation ေခြထည့္ထားမယ္ ဒါဆို ကိုယ့္ boot screen မွ cd room or dvd room ႏွစ္လံုးမွ boot device တက္ေစခ်င္တာကို ေ၇ႊးခ်ယ္ပီး boot device ေခၚၿပီး window တင္တယ္ဆုိပါေတာ့။CPU Internal Cache ဆုိတာက CPU နားမွာ၇ိွေသာ တနည္းဆုိ၇ေသာ္ ram နဲ႔ cpu ၾကားမွာ ယာယီသုိေလွာင္ငွာနလုိ႔ေခၚေသာ s1/s2 လုိ႔ေခၚ cache လို႔ေခၚပီး ဒီေကာင္က sram အမ်ိဳးအစား cache ၿဖစ္ပီး (sram ဆုိတာက rom လုိပဲ မီးပ်က္သြားလည္း data and information ကပ်က္သြားမွာ မဟုတ္ပါဘူး)အဲ့လုိ ဒီ s1ands2 speed ကို mhz နဲ႔တုိင္းတာ ပါတယ္။Cpu မွာနဂိုပါတာက 3.66 Mhz Pentium ဆိုတာက internal speed ကိုေခၚတာပါ။s1 and s2 speed ဆုိတာက ဒီေကာင့္ကို external speed လုိ႔ေခၚတာပါ။အ၇င္ building and pc part 2 မွာေ၇းခဲ့ၿပီးၿဖစ္ပါတယ္ ကၽႊန္ေတာ္။External Cache ဆုိတာက အဲ့လုိမ်ိဳး s1 and s2 ကိုေခၚတာပါ။ဆုိလုိတာက ဒီေကာင့္ကို enter ေခါက္ၾကည့္ Disabled and Enabled ေ၇ႊးခုိ္င္းမယ္။ဆုိလုိတာက Disabled ေပးလုိက္လွ်င္ motherboard ေပၚက အဆိုပါ s1 and s2 cache or external cache ကအလုပ္လုပ္ေတာ့မွာ မဟုတ္ပါဘူး။Quick power on self ဆုိတာက ဒီေကာင့္ကို Disabled and Enabled လုပ္ခုိင္းပီး ဆုိလုိတာက ကြန္ပ်ဴတာ casing ပံုးေ၇ွ႕က power swap ခလုတ္ကိုဆုိလုိတာပါ။ဒါမွမဟုတ္လည္း mother board ကေန power swap cable သာ ၿဖဳတ္လုိက္ရင္လည္း ၇ပါတယ္/First boot device ကုိေတာ့မေၿပာေတာ့ပါဘူး။အေပၚမွာ ကၽႊန္ေတာ္ရွင္းလင္းထားပီး ၿဖစ္ပါတယ္။Second boot device ဆိုလိုတာက first boot device program setting ပ်က္သြားေတာင္ အဲ့ second boot device ကေန အလုပ္လုပ္ေဆာင္ပါလိမ့္မယ္။Third Boot device ပုိင္ကိုေတာ့ သိသြားေလာက္ပါပီ။က်န္တဲ့ Advanced Bios Features မွာပါတဲ့ setting ပိုင္းေတြက hard ware ပုိင္းေတြမွာ သိပ္အေ၇းမၾကီးေတာ့ မ၇ွင္းလင္းေတာ့ပါဘူး။ကိုယ္တုိင္ ဖတ္မွတ္ေလ့လာမယ္ဆုိလွ်င္ ပိုသိပါတယ္။ဘယ္လုိ ၿဖစ္ၿဖစ္ ေပ်ာ္၇ႊင္ပါေစဗ်ာ။
ဒီပို႔စ္ကို PDF FILE လုိခ်င္ရင္
ဒီလိုဗ်ာ hard ware ပုိင္းေတြလည္း ၿပန္ေ၇းခ်င္တယ္ ဆိုပါေတာ့။တစ္ေန႔ၿဖစ္ဖူးတာေလးပါ။ဒီလုိေလး ၿဖစ္ပံုက ကၽႊန္ေတာ္ share ware links တစ္လင့္ကေန download ဆြဲယူတာ hard disk partition c အခန္းကို ကိုက္တာ Trojan က ႏွစ္ေကာင္ win 32 က 6 ေကာင္ေတာင္ ခ်က္ခ်င္းၾကီး ကိုက္လာေတာ့ ကၽႊန္ေတာ့္ လက္၇ိွ anti virus protection defence လုပ္ဖုိ႔ not 32 ခံသံုးတာေလ။ခ်က္ၿခင္းၾကီးလည္း တန္းၿပီး သတ္လို႔မ၇ ၿပီးေတာ့ scan ဖတ္လွ်င္လည္း အၾကာၾကီးပဲ။လက္၇ိွစက္ကလည္း Pentium 4 ဆုိေတာ့ ေလ့လံမွဳ ေတြက၇ိွလာမွာေလ virus သတ္တဲ့ scan ဖတ္တဲ့ေန၇ာေတြ မွာေပါ့ ဒီေတာ့ တစ္ခုေတာ့ ေရးၿပမလုိ႔။System restore နဲ႔စပ္စပ္ၿပီး။အ၇င္ကလည္း ဒီ window os system restore နဲ႔ပတ္သတ္ၿပီး ေ၇းေပးဖူးပါတယ္။ဒီလို System restore ဆုိတာက ဒီ setting က window os ကုိ backup point မွတ္ထားေပးတယ္ေန႔အလုိက္ေပါ့။Backup ဆုိတာကလည္း အဲ့ေန႔အဲအခ်ိန္၇က္စြဲအတုိင္း အဲ့ window os hard disk partition မွာ window က restore points မ်ားကုိမွတ္ထားေပးပါတယ္။အေပၚမွာ ၿပထားပါတယ္။ဆုိလုိတာက ခု ကၽႊန္ေတာ္က 7/10/2009 မွာ virus ကုိက္တယ္ဆုိပါေတာ့ ဒါမွမဟုတ္လည္း ဝင္းဒိုးမွာ မသိတဲ့ errors မ်ားၿဖစ္တယ္ဆုိပါေတာ့(ဆိုလုိတာကကုိက 3/10/2009 ေန႔ကို window ကေန run box ကပဲေခၚေခၚ msconfig လုိ႔ရဲ၇ိုက္ေခၚေခၚ မဟုတ္လည္း my computer ကုိ r click သာေပးၿပီး properties ကေနတဆင့္ Advanced system settings ကမွ system protection/system restore ကေနေခၚေပါ။ဆုိလိုတာက system restore ကုိသံုးၿပီး backup ေခၚၿပီး virus ကုိ၇ွႈင္းထုတ္လုိက္တာ။ဒါက အေကာင္းဆံုးနည္းပါ။ဆုိလုိတာက ေကာင္းမယ့္ restore point ကုိအသံုးခ်ပီး window တစ္ခုလံုးကို bakup ၿပန္ေခၚလိုက္ေတာ့ ေကာင္းတဲ့ေန႔မွာ anti virus protection ကုိၾကည့္လိုက္ေတာ့ 0 ေလ။ေကာင္းတယ္ေလ။ဒါနဲ႔ ၿပသာနာ တစ္ခုကတက္လာတယ္ ဘယ္လိုမ်ိဳးၿပသာနာလဲ?
ဒီလုိ ထိတဲ့ေန႔က window မွာ installation လုပ္ထားတဲ့ software ေတြကို control panel ကေန un install လုပ္လုိ႔မ၇ေ၇ာ။Uninstaller ေတြလည္း သံုးၾကည့္တယ္။အဆင္မေၿပဖူး။Do not uninstall ဆုိပီး ၿပီးေတာ့ destination ေန၇ာကိုညႊန္းတယ္တဲ့။C:\Program Files\Internet Download Manager ဆုိပီးၿပလာတယ္။ၿပီးေတာ့ do not uninstall /ဒီေဆာ့ဝဲလ္ အတြက္ Uninstall လုပ္လို႔မ၇ဘူးတဲ့။ေနာင့္တစ္ခ်က္က ဒီေဆာ့ဝဲလ္အတြက္ un install file တစ္ခုပါမလာတာပဲ။တစ္ခ်ိဳ႕ softwares ေတာ္ေတာ္မ်ားမ်ားဆို software တစ္ခုကို installation ေပးလုိက္တာနဲ႔ window partition အခန္းမွာ Program Files မ်ားမွာ uninstall setup file တစ္ဖိုလ္ပါလာတက္တယ္။Window xp သံုးဖူးသူဆုိ သိသာပါတယ္။All programs ကေနတန္းၿဖဳတ္လုိက္လုိ႔၇တယ္ေလ။သို႔မဟုတ္လည္း window partition အခန္းက Program Files ကေန un install set up file ကုိသာ d click သာေပးလိုက္ ၿဖဳတ္ပီးသားပဲ။ခုက အဲ့လိုလည္းမ၇ ဆုိလုိတာက Program Files ကလည္း un install setup file ပါလာတာေတာင္ ၿဖဳတ္လုိ႔မ၇ ၿပီးေတာ့ control panel ကေနလည္း ၿဖဳတ္လုိ႔မ၇။
အ၇ုိး၇ွင္းဆံုး un install တစ္နည္းနဲ႔ေၿဖရွင္းလုိက္တယ္။C:\Program Files\Internet Download Manager ကိုသြားၿပီး Internet Download Manager Folder တစ္ခုလံုးကို shift del ကီးနဲ႔ကုိင္လုိက္တယ္။ၿပီးမွာ registry ပိုင္းကေန ကုိင္တယ္။ၿပီးမွာ အေပၚမွာ ကၽႊန္ေတာ္ၿပထားတဲ့ registry info path လမ္းေၾကာင္းတုိင္း အနီၿပထားပါသည္။Uninstall ၿမွားေဘးက ဟာကုိသာ drag ဆြဲခ် ဆုိလုိတာက software installation ၿပီးသာနဲ႔ အဲ့ပိုင္းမွာ uninstall files မ်ားဟာကပ္က်န္ခဲ့တယ္။Del key or shift del ကီးနဲ႔ဖ်က္ထုတ္(ထုိမွ ဖ်က္ထုတ္လုိက္ေသာ software files မ်ားဟာ control panel က un install ၿဖဳတ္တဲ့ေန၇ာမွာ ၾကည့္ၾကည့္ က်န္လားလို႔။ႏွစ္ဆင့္သံုးသြားမွ ဟုိ control panel /Uninstall a program မွာ r click ေထာင့္ၿပီး တစ္စကၠန္႔ေတာင္မၾကာဘူး တန္းၿပဳတ္သြားတာ။ဆုိလုိခ်င္တာက အဲ့လိုတန္းၿပဳတ္သြားတာဟာ C:\Program Files\Internet Download Manager ကိုသြားၿပီး Internet Download Manager Folder တစ္ခုလံုးကို shift del ကီးနဲ႔ ဖ်က္ထုတ္လိုက္ၿခင္းပါ။
ေနာင္ဆံုး ေၿပာခ်င္ဆုိလိုခ်င္တာက software installation တုိင္းဟာ software အလုပ္လုပ္ေဆာင္ဖုိ႔ဆုိလွ်င္ C:\Program Files\မွာဝင္ပီးမွ အလုပ္လုပ္ေဆာင္တာပါ။ဒါကေတာ့ ကိုယ့္ software installation ေပးတဲ့အခါ destination ထားတဲ့ေန၇ာေပါ့။ပံုမုန္ဝင္းဒုိးတင္ထားတဲ့ partition/Program Files မွာသာ ဝင္ၿပီး လုပ္ေဆာင္တာပါ။ဘယ္လုိၿဖစ္ၿဖစ္ system restore အသံုးခ်ပံုနဲ႔ Un install ၿဖဳတ္နည္းကို မွ်ေဝလိုက္တာပါ။Uninstall လုပ္ဖို႔ software တစ္ခုမွာ နည္းလမ္းကမ်ားပါတယ္။တစ္ခ်ိဳ႕က မ၇တဲ့အဆံုး window စတက္တက္ၿခင္း f8 key နဲ႔ safe mode ကမွဝင္ၿဖဳတ္လုိက္တာပါ။တစ္ခ်ိဳ႕က un installer software ေတြအသံုးခ်တယ္။နည္းလမ္းကမ်ားပါတယ္။ၿဖတ္တက္တာေလးေတြေပါ့။ဒီနည္းက မွ်ေဝတာပါ။System restore အသံုးခ်ပံုလည္း သိေစခ်င္တာပါ။ေပ်ာ္ရႊင္ပါေစ fri။
ဒီပို႔စ္ကို PDF FILE လုိခ်င္ရင္
ပံုေတြကုိ pixels မ်ားေလွ်ာ့ခ်တဲ့အခါ ဒီ free ware software ေလးတစ္ခုသံုးၿပမလုိ႔။Resize ဆိုတာက ပံုမွန္ေၿပာရ၇င္ လက္၇ိွ window os က paint ပုိင္းနဲ႔ေလွ်ာ့ခ်မယ္ဆို pixels မ်ားက ေသးသြားမွာ ၿဖစ္သလို အဆင္ေၿပမွာလည္းမဟုတ္ဘူး။အ၇င္ကလည္း pixel ေတြေလွ်ာ့ခ်ေပးဖူးတယ္ေလ။Image resizer နဲ႔ေလ။ခုေတာ့ link တစ္လင့္ၿပေပးမယ္။32 bit os နဲ႔ 64 bit os ၾကိဳက္တာကို installation လုပ္ေပးေပါ့။32 bit window os တင္သံုးတဲ့သူေတြကေတာ့ 32 bit download လုပ္ေပါ့။ေလရွည္သြားတယ္။ေဒါင္းလုိက္ဦး
http://imageresizer.codeplex.com/releases/view/30247
Free ware ဆုိေတာ့ ဘာကီးမွမလုိတာေတာ့ သိၿပီးသားေလာက္ေတြပါ။Picture or photo ကို r click ေပးၿပီး Details မွာၾကည့္ေပးပါ။လက္၇ိွ Width ဆုိတာ ေဘးႏွစ္ဘက္ 721 pixels and Height 480 Pixels ကိုၿပထားေပးသည္။ဒါက လက္၇ိွပံု၇ဲ႕ pixels မ်ားကိုၿပထားတာပါ။ေသခ်ာသိခ်င္လွ်င္ r click ေပးၿပီးသာ Open with ကေန paint နဲ႔ဖြင့္ၾကည့္။ေအာက္က paint နဲ႔ဖြင့္ထားတာကို ထပ္ၾကည့္ပါ။
ဒီပံုကို pixels မ်ား resize ေလွ်ာ့ခ်ၿပမလုိ႔
ဘာမွမလိုဘူး installation ေပးၿပီးသာနဲ႔ picture or photo ကုိသာ r click ေပးၿပီး Resize Pictures မ်ားမွာ ဒီ software နဲ႔ပတ္သတ္လို႔ pixels မ်ားသတ္မွတ္ေပးထားတာကို သာ ေလွ်ာ့ခ်ေပးလိုက္။ဆုိလိုတာက Pixels မ်ားလာပါက ပံုေတြက ၾကီးသြားမွာၿဖစ္သလို resolution မ်ားလည္း က်ယ္ၿပန္႔စြာ မထြက္ပဲ ၾကည့္လို႔ေကာင္းေနမွာ ၿဖစ္သလို Pixels မ်ားနည္းလာပါက photos မ်ားလည္း ေသးသြားမွာၿဖစ္ပါတယ္။ရွင္းသြားေအာင္ ေအာက္ကပံုကိုထပ္ၾကည့္ပါ။
ဒါက ဒီ Image Resizer software ရဲ႕ large pixels မ်ားၿဖစ္တဲ့ fit 1920*1080 screen resolution ကုိသတ္မွတ္ေပးထားတာပါ။သေဘာေပါက္ေလာက္မွာပါ fris/ေပ်ာ္ရႊင္စြာ အသံုးၿပဳႏုိင္ၾကပါေစ။
ဒီပို႔စ္ကို PDF FILE လုိခ်င္ရင္
ကၽႊန္ေတာ္တို႔ လက္ရိွ os window 7 ေတြတင္သံုးၾကတယ္။Vista ေတြတင္သံုးၾကတယ္။တစ္ခ်ိဳ႕သတိထား မိမလားေတာ့မသိဘူး။Vista ေ၇ာ 7 ေ၇ာမွ start menu bar ေတြမွာ rum command box ေတြပါမလာတာ ဘဲ။ဘယ္လုိၿဖစ္ၿဖစ္ ပါတာမပါတာေတာ့ အဲ့ေလာက္ေတာ့ ကိစၥမရိွပါဘူး။Window key ႏွင့္ R ကီးသာႏွိပ္ၿပီး ေခၚလိုက္ရင္ရတယ္ လို႔ေၿပာလာဖြယ္ေတာ့ရိွတယ္။ဘယ္လိုၿဖစ္ၿဖစ္ မသိေသးေသာ သူေတြက်ေရာ အခက္ခဲဆုိတာ ၿဖစ္လာတယ္။ေလရွည္သြားတယ္။ေဆာတီး ဆုိလိုခ်င္တာက start menu မွာ run command box ထည့္ရေအာင္။
Start menu bar ကုိ r click ေပးၿပီး properties ကိုသြားလုိက္ပါ။ၿပီးလွ်င္ Task bar and Start Menu Properties box ေပၚလာက Start Menu ကေနတဆင့္ Customize ကေန Run command ကို check point ေပးလုိက္ၿပီး OK and Apply to OK ေပးလုိက္လ်ွင္ အဆင္ေၿပၾကပါလိမ့္မယ္။က်န္ေသာ start items မ်ားကိုလည္း start menu မွာထားၿခင္လွ်င္ chick point ကို mark or no mark ေပးၿပီး လက္ကလိေတာ္မွဳပါ။Knowledge တစ္ခုေလာက္ မွတ္သားေပးပါ။လုိမယ္ထင္လို႔ post ပို႔စ္ကို publish လုပ္လုိက္တာပါ။အဆင္ေၿပမွာပါ။
ဒီပို႔စ္ကို PDF FILE လုိခ်င္ရင္
ဒီလိုဘဲ ဟိုဒီစာေလွ်ာက္ဖတ္ရင္း link site တစ္ခုကိုေတြ႕တယ္။မိတ္ဆက္ေပးတာပါ။လက္တာေလာ net songs links မ်ားမွ songs မ်ား download လုပ္တဲ့အခါ ကြန္နက္ရွင္ အခက္ခဲေၾကာင့္ၿဖစ္ေစ မွဳရင္းဆိုဒ္က သီခ်င္း .mp3 ဒါမွမဟုတ္လည္း ကိုယ္တုိင္ record audio .wav type ေတြဟာ အသံရည္ေသြးေတြဟာ ေၿပာသလို အရည္ေသြးညံ့လို႔ၿဖစ္ေစ အသံတုိးတဲ့အရည္ေသြးေတြဟာ net အခက္ခဲ့ေၾကာင့္ရယ္ sever uploading ၾကာၿမင့္ခ်ိန္ေတြေၾကာင့္ အသံအရည္ေသြးေတြဟာ ေလွ်ာ့ၾကလာပါတယ္။ၿဖစ္တက္တာေတြ ကမ်ားပါတယ္။http://vloud.com/audio_mastering/128069 ဒီလင့္က လက္၇ိွ စက္က .mp3 file and .wav record file ေတြကို အရည္အေသြးၿမင့္ေပးတဲ့ Light ၊ Loud ၊ Louder ၊ Loudest ဆိုၿပီး ရွိပါတယ္။အဲ့လို အရည္ေသြးေတြၿမွင့္တင္ေပးလို႔၇ပါတယ္။Browse ကေန ကိုယ္အရည္ေသြးၿမင့္ၿခင္တဲ့ .mp3 or .wav file type တစ္ခုကိုေ၇ႊးခ်ယ္ရံုပဲ။
ၿပီးလွ်င္ play and download လုပ္လုိက္ရံုပဲ။စမ္းၾကည့္ပါ အဆင္ေၿပမွာပါ။
ဒီပို႔စ္ကို PDF FILE လုိခ်င္ရင္
ခုလည္း Odin Frame Photo Creator ကို serial key နဲ႔တင္ေပးလိုက္တယ္။Odin Frame Photo Creator က funny software ေလးလို႔ လည္းတဖန္ေၿပာလို႔ရပါတယ္။ဒါေပမယ့္ picture and photo file types မ်ားကို ေကာင္းစြာနားလည္မယ္ဆိုလွ်င္ ဒီေကာင့္ကိုသံုးၿပီး တစ္ခ်ိဳ႕ .ico picture file types မ်ားကို ဒီေကာင္နဲ႔ သံုးၿပီး ခ်ိန္းပစ္ၿပီး ေၿပာင္းလည္းသံုးလို႔ရတယ္။ေဒါင္းလိုက္ဦးေအာက္မွာ
Mediafire ကေန 
ဖိုးသားဆုိတဲ့ serial key notepad က serial key မ်ားၿဖည့္ေပးလိုက္လွ်င္ buying ေပ်ာက္သြားမွာၿဖစ္သလို လက္တေလာ စမ္းၾကည့္သေလာက္ေတာ့ register successfully ၿဖစ္တာကိုေတြ႕ရတယ္
Shooting Mode ဆုိတာက လက္တေလာ web cam ရိွမယ္ဆုိ လက္ရိွ camera နဲ႔ကိုယ့္ပံုကို screen shot ရိုက္လို႔ရတယ္။ေဘးနားမွာ screen shot တစ္ပံုရိုက္ၿပထားေပးပါတယ္။
လက္ရိွ Operation ကေန ပံုတစ္ပံုကိုေရႊးခ်ယ္ေပးရပါ့မယ္။လက္တေလာ အေနထားရ .bmp file type ကအံဝင္ေနလို႔ file of types မွာ .jpeg or jpg file type ကိုေရႊးလုိက္ပါ။ဘာလို႔လည္းဆုိေတာ့ ကြန္ပ်ဴတာ အမ်ားစုကပံုမ်ား ဓတ္ပံုဆုိင္ကပံုမ်ားဟာ .jpg or jpeg file type ေတြကမ်ားတယ္ေလ။မိုးေဟကို .jpg file type picture ကိုေရႊးလုိက္ပါတယ္။r click ေပးၿပီး properties ကိုေပးၾကည့္ပါ။
ကၽႊန္ေတာ္ၿပထားေသာ အနီဝိုင္း ေနရာကိုသာ ႏွိပ္ၾကည့္ေပးပါ။Background sheets မ်ား drag sing အလုိက္ ေၿပာင္းသြားမွာ ၿဖစ္ပါတယ္။
ဒီပံုကို ၿပထားေသာ button ကိုႏွိပ္လုိက္ရင္ Edit photo ကိုႏွိပ္ၿပီး photo design ေတြကို ၿပင္ေပးလုိ႔ရပါတယ္။အေပၚက ကၽႊန္ေတာ္ၿပထားတဲ့ ပံုလုိေပါ့။
ေနာက္ဆံုး saving ေပးတဲ့ပိုင္းမွာ သူရဲ႕အားသာခ်က္ေတြေပါ့။ဆုိလုိတာက ကိုယ္ႏွစ္သက္တဲ့ပံုကို ဒီ application program ေလးသံုးၿပီး .ico နဲ႔ saving ေပးလုိက္မယ္ဆုိလွ်င္ ကၽႊန္ေတာ္တုိ႔ folders and icons မ်ားကို icon changing ေပးလုိက္တဲ့အခါ window os နရို မွာက .bmp file type and .ico file type မ်ားသာ လက္ခံသည့္အတြက္ အဆင္ေၿပမွာပါ။အဆင္ေၿပၾကပါေစ။
ဒီပို႔စ္ကို PDF FILE လုိခ်င္ရင္

 Kaspersky Keys 18 AUG 2011 <---- လိုခ်င္ရင္ ႏိွပ္ပါ
ဘေလာ့လ္ႏွင့္ ပတ္သတ္ၿပီး သိခ်င္လိုက ဒါကုိ ဖတ္ရူပါ
Kaspersky Keys 18 AUG 2011 <---- လိုခ်င္ရင္ ႏိွပ္ပါ
ဘေလာ့လ္ႏွင့္ ပတ္သတ္ၿပီး သိခ်င္လိုက ဒါကုိ ဖတ္ရူပါ

 ZawGyi Font ယူရန္
 Warmly welcome to write


